How to mitigate fraud on iOS devices using App Attest and DeviceCheck
 Chip Loder
App Attest and DeviceCheck are important to retain revenue.
App developers can minimize fraud by using App Attest and DeviceCheck, two tools provided by Apple. Here's how to use them to prevent unauthorized modifications to your app, and to prevent users from illegitimately acquiring premium content.
As an app developer, there are a few ways that you can make money from your creations. However, not everyone may be willing to pay, but still want to access some paid premium features.
Developers seek to avoid this sort of behavior. This is where Apple's App Attest and DeviceCheck step in.
By using Apple's DeviceCheck framework, you can ensure only authorized users can access premium content and promotions.
DeviceCheck
Apple provides the DeviceCheck framework to help your app reduce attempted fraudulent use of premium app features.
DeviceCheck helps mitigate fraud on promotional offerings in apps.
For example, if your app offers promotions or premium content, some users may try to abuse the features to get multiple free items. They could do this by uninstalling and then re-installing your app.
The DeviceCheck framework allows your app to see if a particular hardware device has already received a promotional offer.
These checks are tied to the Secure Enclave in each Apple device. They're combined with an Apple Account and a private cryptographic key to ensure authorization.
This check includes:
- Two device state bits stored by Apple along with a timestamp
- Per device, per developer
- Persistent across hardware device resets
The two bits stored by Apple tie each Apple developer to a known state for any previously registered promotions per app. Along with the timestamp you can use the bits any way you like in order for your app to determine promotion status.
DeviceCheck keeps track of devices on a per-device basis, per app developer.
The DeviceCheck state is saved across device resets, should the Apple device be completely reset to factory condition.
These checks can be used by your app to see if a given promotion was previously used by any app by any Apple Account on any Apple device.
App Attest
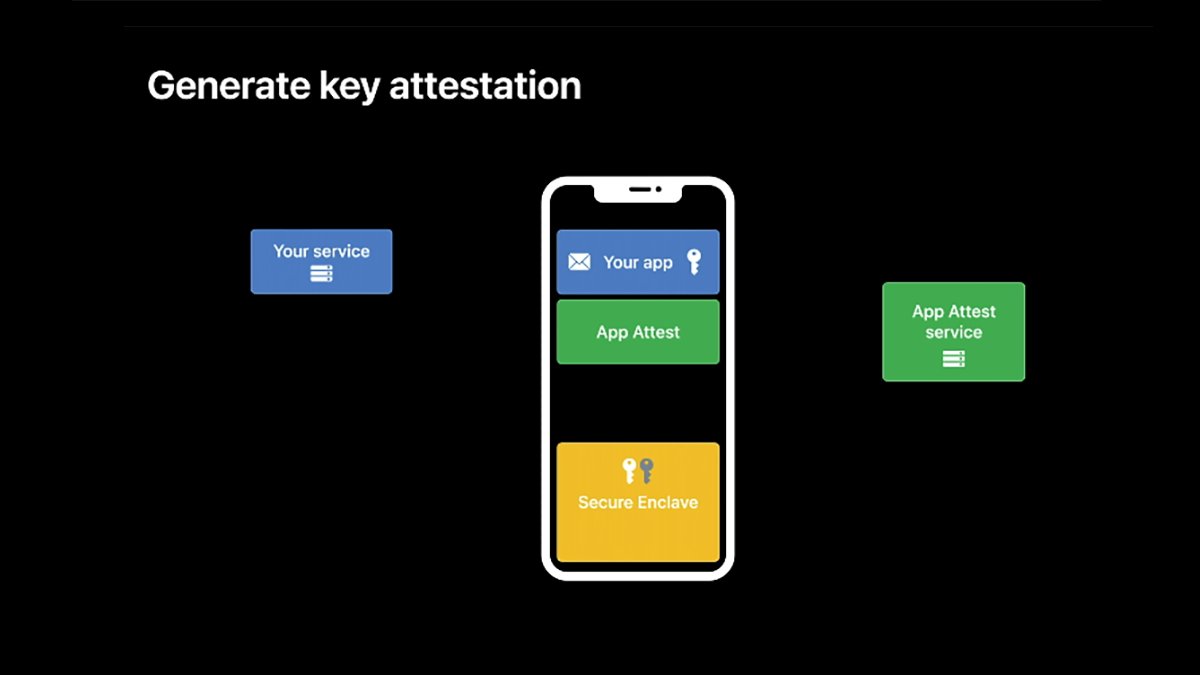
App Attest is also part of the DeviceCheck.framework and allows you to track any given service your app features in order to determine if that service is one your app recognizes.
In order to use App Attest you will need either a server or cloud-based service to receive hardware-based tokens from the user's device, along with an App Attest request. Your server must then forward these app requests on to an Apple App Attest server for verification.
If the Apple server returns that the app and service are valid, your server informs the sending device that the request is valid.
Since each request is tied to specific device hardware info, requests can't be forged or copied for other devices.
App Attest also prevents illegitimate copies of premium app or service features from being copied from one device to another.
Three easy pieces
App Attest provides three key pieces of info your app can use to verify that a request came from an authentic, authorized Apple device:
- Genuine Apple device
- Authentic application identity
- Trustable payload
Checking for a genuine Apple device allows you to verify that the app and premium content are, in fact, being run on a real Apple device.
Authentic application identity makes sure that the app which is making the request is your app and that it is a legitimate copy. One which has been downloaded from the App Store.
Trustable payloads can be checked to confirm the premium feature or promotional content is authorized, has been purchased, and has not been tampered with.
By using these three pieces of info, your app can make sure the content should be available to the user. This prevents hackers and jail-breakers from attempting to download or reuse premium content paid for and authorized on another Apple device.
The genuine device check is accomplished by a an examination of a secure key pair on the device, which is used by the Secure Enclave. It's combined with an App Attest request from the device which is generated using the valid key pair.
Secure key pairs are part of what is called Public Key Infrastructure (PKI) which uses encryption to create secure keys and sends them over a network.
By using secure keys and digital signatures, an app and device can confirm a request originates from who it claims to.
PKI is extremely secure and even the most performant supercomputers in the world require years to crack it.
When your app makes an App Attest request, it can use the secure keys to do so, which can then be verified by the server. Each secure key is unique per installation and are not synced or copied across devices.
An encoded copy of each requesting app's Bundle ID is also sent with each request for verification.
Adding App Attest to your app
To add App Attest to your app in Xcode, you must first include the DeviceCheck.framework in the Build Info tab in each project target's frameworks pane.
In order to use App Attest in your app, the app must be running on a device with a Secure Enclave. Therefore you must always check for the ability to use App Attest in your app before you actually do so.
There are also three parts to adding App Attest to your app:
- Generating an AppAttest key
- Verifying keys
- Generating and verifying assertions
To create an AppAttest key in your app's code, use the .shared property on the DCAppAttestService class object like this:
let appAttestService = DCAppAttestService.shared
This creates a local variable named appAttestService from the .shared property and stores a copy of the shared service object.
Once you have an instance of the .shared property, you can use it to create a key:
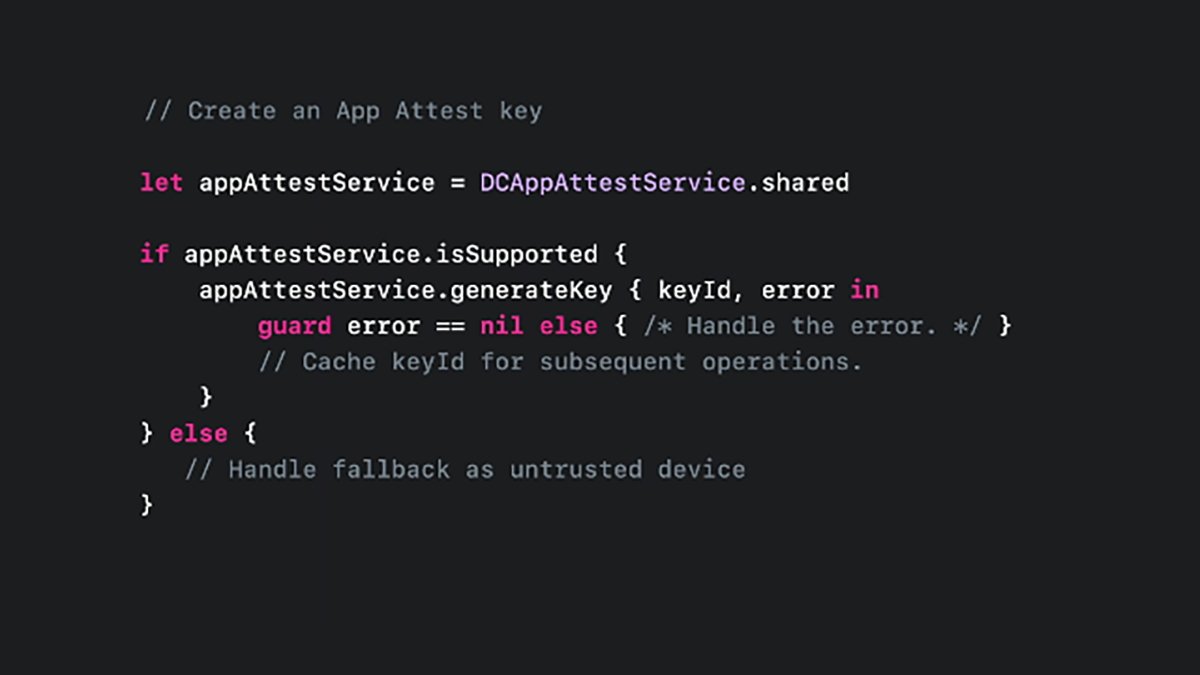
In the above code, you first get a shared instance of the DCAppAttestService class. Then you check its .isSupported property to make sure AppAttest is available on this device, and then generate a key with the .generatekey method.
If .generatekey returns an error, you check for it and handle it, else the key is returned in keyId.
Once you have the key, you can then store it away for later use - most likely in an object you defined and created previously.
The DeviceCheck.framework also supports Objective-C interfaces if you are still using that language instead of Swift.
If the .isSupported property returns NO or the key returns nil you can't use AppAttest in your app.
Be aware there are some cases in which code may still return NO for the .isSupported. Even if the device does have a Secure Enclave in it (usually if the code is called from an app extension).
Your app must be prepared to handle these cases as well. In these situations assume the caller is untrusted, then devise your own code logic based on a set of risk assessment rules to determine if the premium features should be allowed.
This approach is a second-best validation when the .isSupported property returns NO.
Validate key
Assuming you do have a valid key from the above code, the next step is to validate or attest the key.
To do this your app will need to create a one-time server challenge. This challenge is designed to attest the key you generated with a challenge from your server, which validates the key in combination with user account info.
You will need to also devise server-side code to do this for each key attest occurrence.
Key attestation provides an additional level of security by preventing man-in-the-middle and replay attacks.
The first step in this process is to generate a key attestation. You use the same app attest server object as above, but with the .attestKey method.
Using this method, you pass the original keyID, a client data hash, an attestationObject, and an optional error variable which the .attestKey method takes as input.
On return, the attestationObject can be used for the server challenge.
The purpose of the .attestKey method is to use the device's private key to create an opaque hardware attestation request. One tied to the key and this specific device.
This hardware attestation is then sent to an Apple attestation server for hardware verification. Once verified, the Apple server will return an anonymous attestation object to your app.
Only Apple's server knows how to verify the device at a hardware level based on the info sent to it, thus making it very difficult for hackers to intercept the request and return a false positive that enables the premium features.
Once the app receives the response from Apple and makes sure it is valid, the app should then send the response along with any custom payload to your server for final verification.
This rather complex process, combined with Apple's hardware verification and a private key, makes it very difficult for anyone to hack your premium features and enable unauthorized content.
Apple's WWDC 2021 video entitled Mitigate fraud with App Attest and DeviceCheck explains this process in more detail.
There's also a section Create a DeviceCheck private keyin the Configure Capabilities area of the Apple Developer account documentaiton.
There are four additional sections in the DeviceCheck framework documentation that you'll want to check out:
- Accessing and modifying per-device data
- Assessing fraud risk
- Establishing your app's integrity
- Validating apps that connect to your server
Handling errors
In the above code, we saw some of Apple's DeviceCheck APIs return an optional error code.
Your app should handle these codes and inform the user if any errors occur.
Check out the documentation for the DCDevice and DCError classes in the DeviceCheck framework.
You can also obtain user displayable error codes from any DeviceCheck framework API which returns a DCError by getting the value of its .Code property. This is defined as an enum (a number) which can be mapped to a set of predefined Apple error codes.
Using a standard Swift/C case statement, you can then map an error code result to a user-displayable string your app shows to the user.
Currently, there are five predefined DCError codes set by Apple:
- featureUnsupported
- invalidInput
- invalidKey
- serverUnavailable
- unknownSystemFailure
featureUnsupported means that some or all of the DeviceCheck API isn't available. invalidKey means the key you tried to use failed.
On any error return from an Apple API or the key attestation, your app should display an appropriate localized text string to the user, informing them why it didn't work.
You can also check the global variable DCErrorDomain after errors to determine the domain of the last occurring error.
Think of error domains as categories errors are organized into. By using the DCErrorDomain string, you can give users additional useful info on what type of error occurred.
DeviceCheck and AppAttest are welcome additions to Apple app development. By using them in your app, you can secure your premium features and revenue without too much extra work.


 Amber Neely
 William Gallagher
 Andrew O'Hara
 Christine McKee


 Sponsored Content


1 Comment
I find it freaky that an app can know that it has previously been installed on a device that has been factory reset and sold. Surely this contravenes Apple’s Prime Directive of privacy?