Why I prefer the iPad Pro to my Mac for importing and editing photos

"I didn't expect to go this route, iMac. I'm truly sorry. But the iPad Pro is just better than you are when it comes to importing and editing images." This is a sentence I literally spoke out loud to my Mac a few days ago.
Now, while we could ruminate on why someone who works at home is compelled to speak to her inanimate objects, I'd prefer to focus on the content of said speech: I've pretty much stopped importing and editing images on my Mac. Though I didn't expect it, the iPad provides me with an easier and quicker workflow for posting hero images on iMore than my Mac ever did.
It's all in the workflow

Warning: The disk was not ejected properly.
I didn't always think it would be this way. When I got my iMac, one of my big excitements was that little SD Card slot on its rear port array — something my 11-inch Air never offered. My dongle-less future was here, and it was shiny and chrome.
But once I got past the euphoria, I realized: Even without a dongle, importing images to your Mac is kind of a pain.
For iMore, my photo workflow goes as follows:
- Arrange a photo for my article and shoot the photo on my DSLR.
- Import the photos from said shoot to my computer.
- Pick the best photo of the bunch for my article.
- Eradicate any stray pet hair or dust motes with Pixelmator's Repair tool, and adjust color if necessary.
- Resize the photo to iMore CMS-acceptable size and export.
- Upload to iMore.
On the Mac, that workflow looked like this:
- Shoot photos on DSLR. Remove SD Card, insert into iMac.
- Manually open Photos, and import the bunch by clicking "Import Selected", then delete the images off the SD Card. Remove the SD Card and get a "Warning: The disk was not ejected properly" alert. Ignore it and pray I didn't screw up my SD Card's formatting.
- Flip though images, pick the best of the bunch. Save it to the Desktop, because Photos doesn't consistently support directly dragging a thumbnail into a program.
- Open that Desktop-exported image in Pixelmator. Clumsily attempt to edit with mouse, or take three minutes to set up my Wacom tablet. (99 percent of the time, it's the former.) Adjust color appropriately.
- Resize and rename the photo in Pixelmator, and export as JPG to the Desktop.
- Open the iMore CMS article, and upload the image.
Not the worst workflow, but there are a couple of frustrating bits in there. First off, while it's a small thing, remembering to manually eject an SD Card is a pain — especially when there's conflicting evidence that it hurts your drive. Also, in order to edit an image with Pixelmator's Repair tool, I have to save a copy to the desktop, because Photos is weird about directly editing an image from its library. I could use Pixelmator's Photos image extension, except that it doesn't offer the repair tool — only filters.
Master your iPhone in minutes
iMore offers spot-on advice and guidance from our team of experts, with decades of Apple device experience to lean on. Learn more with iMore!
Once I'm in Pixelmator, trying to perform any sort of complicated repair with a trackpad is laughable. I've hooked up my wired Wacom tablet in the past, but it's a hassle — more cords, positioning it in such a way that I'm not accidentally pressing keys while I draw, all sorts of fun. I usually just default to using the repair tool as a circle stamp for dust motes and praying I don't need to remove any pet hair.
It's gotten so crowded that I've had files sitting atop files on my Desktop before.
When I'm done with repairing the image and any color correction, I have to save it once more to the Desktop in resized form, with the proper title for iMore's CMS. If I'm not diligent about cleaning up my desktop, this results in an invasion of JPGs after a week or two: It's gotten so crowded that I've had files sitting atop files on my Desktop before.
After saving my file, I visit iMore's CMS and upload the file, all the while praying that viewing "Modified by" in the file uploader's list view will actually give me the latest files at the top of the screen. (There's a fun OS X bug that results occasionally in new images being organized under a "No Date" heading at the very bottom of the screen.) Once I find the file, I upload it, and add it to my article.
My glorious iPad Pro solution

There's nothing egregiously bad about that Mac workflow — no showstoppers, no "throw my hands up in the air" frustrations. But the tiny nits and bugs add up to a general malaise over preparing images for iMore.
Thankfully, here's where the iPad Pro came in and saved my sanity. On the iPad, my workflow looks like this.
- Arrange a photo for my article and shoot the photo on my DSLR or iPhone.
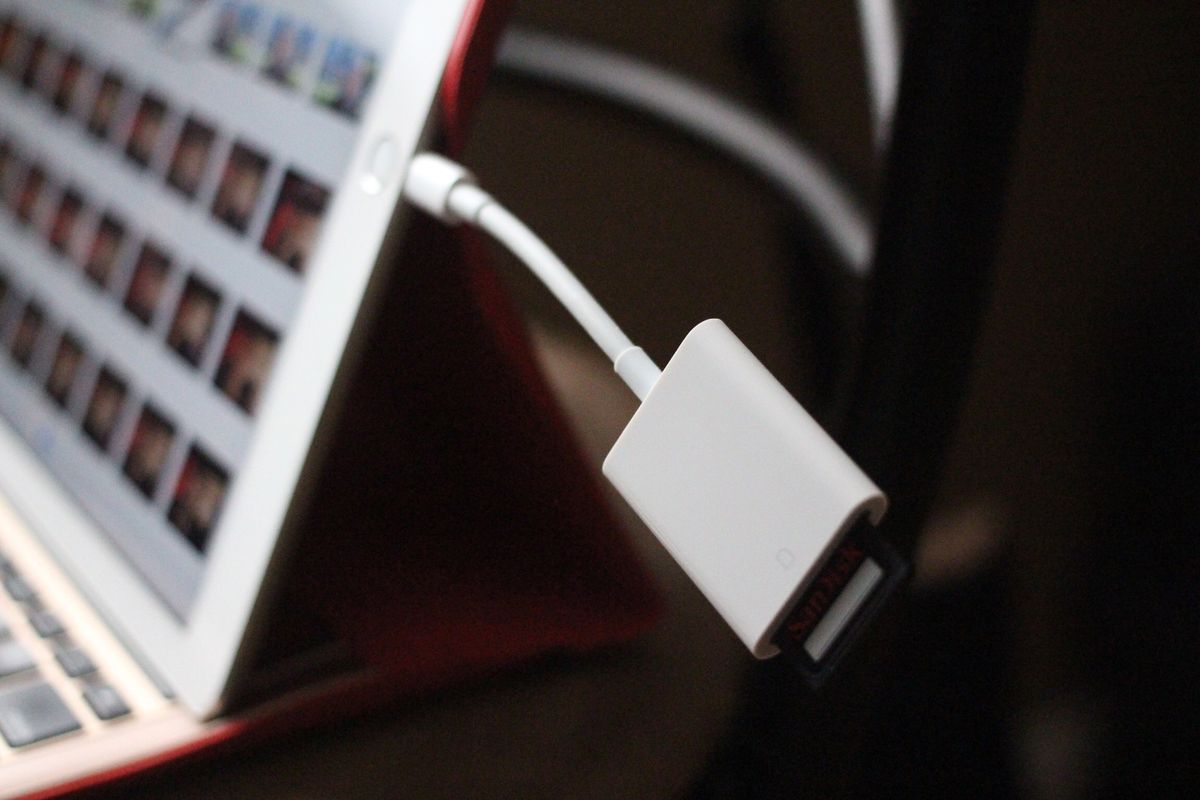
- Use the SD Card to Lightning dongle to import said photos to my iPad. Photos automatically opens, and I can swipe to select the images I want and tap "Import selected." (If shooting on my iPhone, I can also AirDrop images to my iPad.) Once done, I can remove the SD dongle at my leisure, no Eject button necessary.
- In Photos, I pick the best photo of the bunch for my article, then tap the Share button and use my "Send to Pixelmator" workflow.
- The iPad opens up Pixelmator automatically with my image inside it; I use the Apple Pencil to eradicate any stray pet hair or dust motes with Pixelmator's Repair tool, and adjust color if necessary.
- I tap "Open in Another App", choose my format (JPG), and run my "Resize, name, and upload to iCloud Drive" workflow that resizes the image, names it, and uploads it to iCloud Drive.
- I open iMore and upload the file to iMore's CMS.
Where the iPad Pro succeeds, surprisingly, is in app interconnectivity. We generally think of iOS apps as their own individual sandboxes, but sharing extensions are exceedingly powerful at moving your files from one location to another.

Workflow removes steps I might otherwise have to take on the iPad by giving me great cross-app automation power. I have two sharing extension-based workflows I regularly use in my photo work with iMore: Open In, and Preview, Rename, Resize, and Save. I built the first one myself, but I have to give MacStories's Federico Viticci credit for the latter — that workflow alone helped make the iPad Pro a viable work machine, and I've built several non-photo workflows based off of it.
The "Open In" workflow lets me automatically send a copy of the image or other file from my current location to the new app. Because iOS apps use iCloud Drive and the sandbox, they automatically copy data from one location to the other. I never have to worry about saving my files and re-opening them in a new program, or deleting those files later; iOS takes care of that automatically for me.
I never have to worry about saving my files and re-opening them in a new program, or deleting those files later; iOS takes care of that automatically for me.
The Preview, Rename, Resize, and Save workflow is the iPad's finishing move: Once I've completed any image editing, running this workflow results in a chain of events. It previews the completed image for me, asks me for a file name, resizes the photo to 1536 pixels tall for iMore's CMS, and asks me for a location in iCloud Drive to save the file. Once it's in iCloud Drive, it's only two taps to get it into iMore's CMS — files are organized properly by date, so it's easy to find the latest file.
On top of the Workflow automations, I've got added bonuses in no-nagging SD Card removal and Apple Pencil support. On the SD Card side, there's no digital Eject button anywhere in Photos, so no need to worry about whether or not you're damaging your SD Card — it's all taken care of for you. Is it worth the hassle of adding a dongle back into my workflow? For me, absolutely.
The Pencil, likewise, makes image editing a breeze: I can just pick up my Pencil and edit away, no pairing or extra connections necessary. Pinch to zoom means I can work with precision detail on my images, and the Pencil is a heck of a lot better at helping me make pet hair disappear than my Magic Trackpad.
The right tools for the right job

I'm not going to go so far as to say that the iPad Pro should be everyone's solution for photos. It still falls short in a major arena for many photographers, myself included: image management.
Organizing images is nigh-impossible on the iPad. Photos isn't the right tool for it yet — and I'm not sure it may ever be one — and there aren't really third-party apps out there designed to capitalize in that area. Batch processing is virtually non-existent, and you can't create or edit smart albums from your iPad to make up for it. RAW support isn't great, either; nor is keyword organization; metadata viewing and editing is impossible without a third-party app.
There's no need to insist on using one for everything.
But here, I don't actually mind going back to my Mac. The beauty of iCloud Photo Library is that any images I upload to my iPad get wirelessly downloaded at full resolution on my Mac; there, I can do more advanced batch management — tools that Photos for Mac offers but the iPad has yet to.
I own both devices, so there's no need to insist on using one for everything: My iPad works better for importing and editing images, so I'm using it for those tasks; my Mac is still king when it comes to organization and management, so it wins out there. And honestly, I like that workflow. I'm more likely to have my iPad close to me when out and about shooting images for iMore; when it comes to actually organizing them long-term, it makes more sense to do that in the comfort of my office, with my iMac at my side.
And at the end of the day, I'm just excited I found a workflow that will never yell at me about improperly ejected SD Cards again.
Serenity was formerly the Managing Editor at iMore, and now works for Apple. She's been talking, writing about, and tinkering with Apple products since she was old enough to double-click. In her spare time, she sketches, sings, and in her secret superhero life, plays roller derby. Follow her on Twitter @settern.


