How to enable Windows 11's built-in camera privacy warning
Windows 11 can warn you when your webcam turns on — here's how.

Windows 11 has a built-in warning system to alert you whenever your webcam is turned on, just in case it doesn't come with its own little light to let you know "hey, I'm switched on — act accordingly."
This privacy indicator warning is nice to have enabled, even if you're using one of the best webcams on the market, because Windows 11 will display a warning on-screen that can be more attention-grabbing than an LED lighting up on your webcam.
Windows tends to disable this warning automatically, but you can turn it back on if you're comfortable mucking around in your PC's registry. But even if that makes you nervous, try not to worry — it's a simple enough process and the risks are minimal, especially if you follow our advice and make sure to back up your PC beforehand.
You can use Windows 11's built-in backup tools to create a restore point before you start fiddling with things. (Simply hit the Start button and type "create a restore point", then hit Enter.) You can also turn to one of the best cloud backup services to back up your PC to a remote server.
Once you're feeling ready, roll up your sleeves and have a look through the following step-by-step guide to how to enable Windows 11's hidden camera privacy warning system.
How to enable Windows 11's built-in camera privacy warning
1. The first thing we need to do is get into the Registry Editor. One of the fastest ways to do that is to hit the Start button and type "Run", then hit Enter when the Run app is highlighted to launch it.

2. In the Run app, type "regedit" and press Enter to launch the Windows Registry Editor.
Sign up to get the BEST of Tom's Guide direct to your inbox.
Here at Tom’s Guide our expert editors are committed to bringing you the best news, reviews and guides to help you stay informed and ahead of the curve!

3. Now we get into the nitty-gritty part of working in the Windows registry, which is where Windows stores settings for all sorts of system-level features. We're looking for a specific registry key, and to find it you need to navigate to the Computer\HKEY_LOCAL_MACHINE\SOFTWARE\Microsoft\OEM\Device\Capture folder.
You can get there by either scrolling down the file tree in the lefthand pane of the Registry Editor, or simply copying and pasting "Computer\HKEY_LOCAL_MACHINE\SOFTWARE\Microsoft\OEM\Device\Capture" into the navigation bar near the top of the Registry Editor.

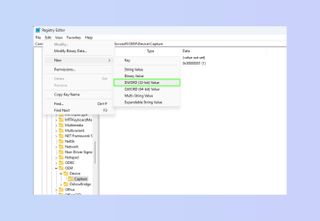
4. Once you've found the /Capture folder, looking for an entry called NoPhysicalCameraLED. It should have a value of either 0 or 1, and you just need to double-click on it to edit its value. If it doesn't exist you'll need to create it by navigating to Edit>New>DWORD (32-bit) value.

5. Now that you've either opened the NoPhysicalCameraLED or created one, you need to set its value to 1 to tell Windows that yes, you don't have a physical camera LED (even if you do) and you would like Windows to warn you any time your webcam turns on.

Once you have a NoPhysicalCameraLED flag with a value of 1 in the Computer\HKEY_LOCAL_MACHINE\SOFTWARE\Microsoft\OEM\Device\Capture folder, you should be good to go!
Just restart your PC and voila, you should have a working webcam privacy warning system.
For more useful Windows tips, check out our guides to cool tricks like how to play Android games on your PC with Google Play Games or how to create a Kill Switch in Windows. We can also show you how to customize the Windows 11 Start menu, how to screenshot on Windows and my personal favorite, how to enable God Mode in Windows.

Alex Wawro is a lifelong tech and games enthusiast with more than a decade of experience covering both for outlets like Game Developer, Black Hat, and PC World magazine. A lifelong PC builder, he currently serves as a senior editor at Tom's Guide covering all things computing, from laptops and desktops to keyboards and mice.