Call of Duty: Black Ops Cold War Evidence locations
Your guide to finding all six pieces of secret evidence in Call of Duty: Black Ops Cold War

If you've completed Call of Duty: Black Ops Cold War's story campaign, then you've already had your share of cool experiences. But having a sit-down with Mikhail Gorbachev or averting a nuclear disaster is just the beginning. The game is packed with more covert ops, clandestine meetings and Cold War conspiracies than you can shake a hammer and sickle at. But you'll need more than a full ammo clip to discover all of its secrets.
Six pieces of key evidence, hidden throughout the game's core campaign, are required to properly solve the mysteries behind the Operation Chaos and Operation Red Circus side missions. Locking, loading and laying waste to evildoing communist sympathizers will get you most of the story. But gamers who want the full narrative payoff will want to holster their hardware and read our detailed guide for finding this off-the-beaten-path intel.
- Play the best Xbox Series X games
- Also try the best PS5 games
Operation Chaos Evidence
You'll need three pieces of evidence for each side mission, and you'll start by securing your first, for Operation Chaos, in the Nowhere Left to Run main mission.
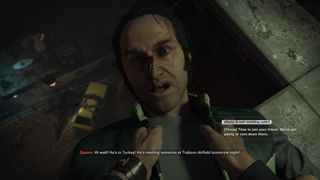
While much of the coveted intel comes in the form of physical items, you'll acquire this first piece via interrogation. Before Nowhere Left to Run's airfield finale, you'll catch up with baddie Quasim during a rooftop chase. Rather than execute the target, you'll need to chat him up. Specifically, you'll want to ask him, “Who's Arash meeting with?” when this dialogue choice pops up.

Do this, and you'll find yourself the proud owner of your first piece of evidence: A Coded Message.

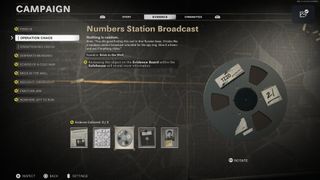
Next up, you'll want to tackle Brick in the Wall, where you'll uncover the Numbers Station Broadcast evidence

This mission includes an optional objective, which has you tracking down an informant named Richter. Follow this stealth-heavy side quest, picking any locks and picking off any guards along the way, until you find the character tied to a chair in a basement. You can rescue the chap after killing his trio of clueless captors, but the real goal is the old school audio reel sitting on a table behind an equally dated camera.
Sign up to get the BEST of Tom's Guide direct to your inbox.
Here at Tom’s Guide our expert editors are committed to bringing you the best news, reviews and guides to help you stay informed and ahead of the curve!

While you're in Brick in the Wall, you can also scoop up a piece of evidence for Operation Red Circus (this is the only mission containing two pieces of evidence). Near the end of this mission, you'll find yourself snooping around the private residence of Franz Kraus. You'll need Mr. Kraus' ledger, located in his bedside table.

Securing it won't be easy. Kraus and his family are home, roaming about, so you'll want to stealthily stick to the shadows as you make your way to the master bedroom.

Your final piece of evidence for the Operation Chaos side mission is the Front Page of the Observer, located in Redlight, Greenlight. While you'll ultimately unlock the coveted newspaper, you'll actually spend much of the mission searching for special items to photograph. There are six possible pieces of photo intel, but you'll only need to snap pics of three of them to unlock the evidence. With this in mind, your best bet is to take pictures of the first three items.

Upon reaching the secret Soviet base, you'll be prompted to photograph it as part of the critical path. Shortly after, you'll find yourself in a guard house. Equip your camera again, and take a pic of the map and blueprint on the wall. Once you've infiltrated the base, you'll soon wind up in a long corridor, which contains some open doors and a number of guards. Once you've cleared the area of threats, you'll need to head through the first door on your left. On the wall, to the right, you'll find a map just begging to have its picture taken.
With two pieces of photo intel acquired, you'll be able to holster your camera for a bit and let off some steam with a good stretch of gunplay. Take out all the enemies – and there are lots of them – on the faux American main street, then head to the second floor of the building sitting across from the fast food burger joint. With a bit of searching, you'll discover a map attached to a brick wall. Take this third picture and the Front Page of the Observer will be added to your evidence cache.

Operation Red Circus Evidence
Having already secured Operation Red Circus' first piece of evidence while sneaking about in Brick in the Wall, only two more pieces remain. The first of the pair is the Cassette Tape with Activities Report, located in the Echoes of a Cold War mission.

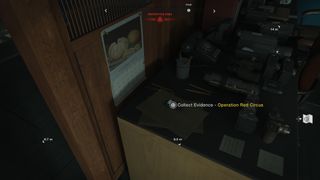
There's a fair bit of combat at the beginning of this chapter, but once you've stained the snow with the blood of your enemies, you'll zipline toward a large communications base. Take out the guards exiting the structure, then search the abandoned building for the evidence. Among the debris and old-timey computers, you'll see a desk with the tape just sitting there for the taking.

Operation Red Circus' final piece of evidence can also be the game's most tedious to uncover, as it randomly changes locations. You're looking for the Wristwatch Containing Dead Drop List within KGB headquarters in the Desperate Measures mission.

Once you've met with Gorbachev and his goons, you'll be required to turn off the building's security cameras. With this critical objective completed, you're free to search for the evidence. The wristwatch could be in the server room, the records room, or behind some other closed door. Your best bet is to use the provided map, utilize stealth – including hiding any corpses you've created – and systematically go through the rooms, checking the various desks and tables for this final clue.

It's important to note, if you've already completed Black Ops Cold War's campaign, you needn't replay it in its entirety to find the six pieces of evidence. With missions unlocked, you can access them immediately – and in any order – and focus on securing the hidden items. Even better: There's no need to complete the missions once you've scored the intel. Simply scoop up the evidence, wait for the game to auto-save, and you're good to go.
Additionally, while you're certainly welcome to collect the various items in the order recommended above, there's no required sequence. Choose your own preferred path, have fun and happy hunting.
