All 83 Elden Ring DLC boss locations in Shadow Of The Erdtree
Find all 83 Elden Ring DLC bosses with our Shadow Of The Erdtree boss locations guide


Searching for the locations of all 83 bosses in the Elden Ring DLC? Bosses have been the lifeblood of From Software's games over the past 15 years, and no Elden Ring DLC would be complete without a variety of new boss encounters for players to beat themselves against for hours on end. Thankfully, Shadow Of The Erdtree is one of the most ambitious and expansive DLCs we've ever seen, adding over 80 new bosses, invaders, and great enemies to defeat, all spread across various different regions and hidden areas.
Elden Ring veterans will know just how secret some of the Elden Ring boss locations are in From Software's gargantuan RPG. So to help you track down all of them, we've put together our definitive guide on all 83 Elden Ring DLC bosses and where to find them.
You can view all the DLC boss locations at a glance using either our spoiler-free map (which shows no names) or our full map, which helps you keep track of each and every boss in the DLC. Further down, we've also written up entries on each of the bosses in the Elden Ring DLC, so you know exactly where to find them, what you get from them, and what to expect when you meet them in battle.
In this guide:
Elden Ring DLC boss locations map
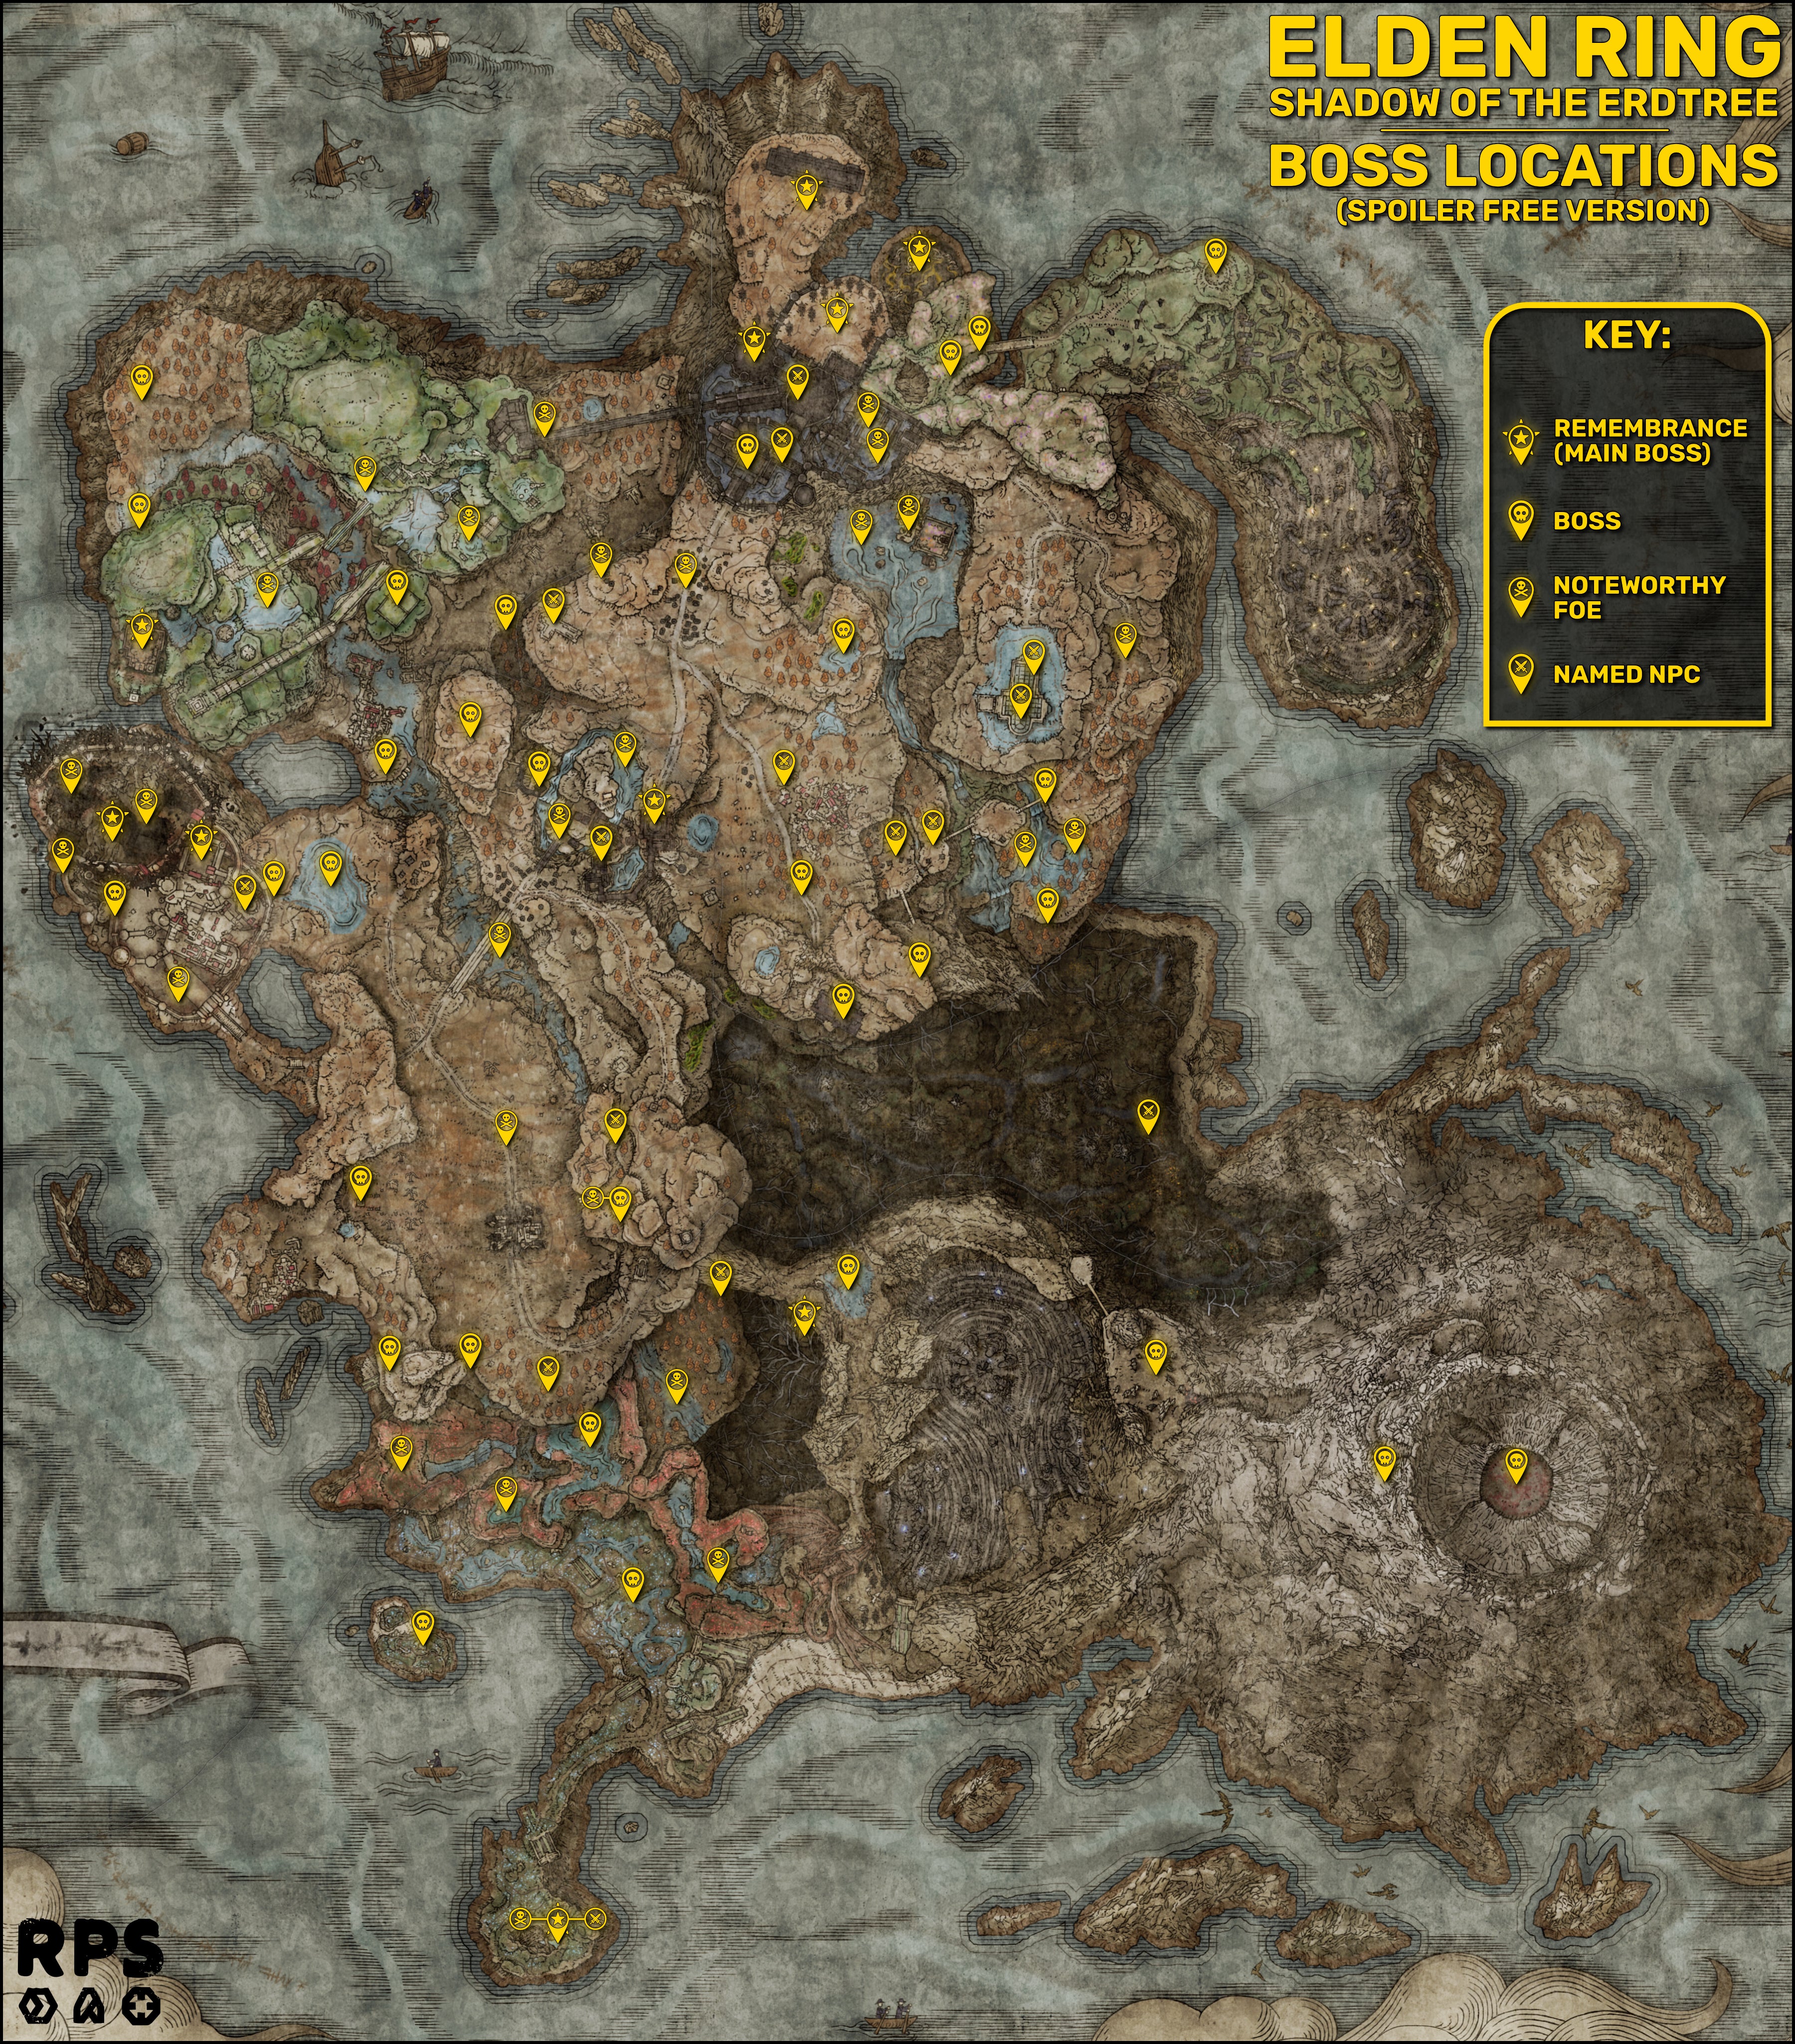
There is a grand total of 83 bosses in the Elden Ring DLC, Shadow Of The Erdtree. To help you keep track of all those boss locations, we've put together two maps below. The first map is spoiler-free, and shows only the locations of each boss, without any names, so you can discover what awaits you there yourself. Immediately below it, you'll find our full DLC boss locations map, which reveals the names of all the bosses and where to find them, to help you easily track them down. Pick whichever map you prefer, and then scroll below for even more details on all the Elden Ring DLC bosses!
Spoiler-free DLC boss locations map:

Full DLC boss locations map (Spoilers!):

All 83 Elden Ring DLC bosses
This guide includes not only bosses with full-screen health bars, but invaders, repeated lesser boss encounters, and other particularly noteworthy foes to make sure you experience all the major fights in Shadow Of The Erdtree.
If you count only enemies with boss health bars at the bottom of the screen, then Shadow Of The Erdtree would only contain 41 bosses. However, if you include named NPC enemies and invasions, then there are 55 bosses in the DLC; and if you include repeated bosses and other boss-like enemies such as Furnace Golems, Hippopotamus, Ulcerated Tree Spirits, Divine Beast Warriors, and so on; then there's a grand total of 83 bosses in Shadow Of The Erdtree.
Here is the list of all 83 Elden Ring DLC bosses, divided by region.
Gravesite Plain bosses:
| No. | Boss Name | Location |
|---|---|---|
| 1 | Logur The Beast Claw | South Woods |
| 2 | Blackgaol Knight | Western Nameless Mausoleum |
| 3 | Furnace Golem #1 | South Of Three-Path Cross |
| 4 | Ghostflame Dragon | Lake Outside Belurat |
| 5 | Demi-Human Swordmaster Onze | Belurat Gaol |
| 6 | Ancient Dragon-Man | Pillar Path |
| 7 | Magma Wyrm | Dragon's Pit |
| 8 | Ancient Dragon-Man | Dragon's Pit |
| 9 | Death Knight | Fog Rift Catacombs |
| 10 | Ulcerated Tree Spirit #1 | Ellac River |
| 11 | Chief Bloodfiend | Rivermouth Cave |
| 12 | Furnace Golem #2 | Ellac River Downstream |
| 13 | Moore | Any Forager Brood Location |
Belurat bosses:
| No. | Boss Name | Location |
|---|---|---|
| 14 | Ulcerated Tree Spirit #2 | Poison Lake |
| 15 | Fire Knight Queelign | East Garden |
| 16 | Divine Beast Dancing Lion | Theatre Of The Divine Beast |
Castle Ensis bosses:
| No. | Boss Name | Location |
|---|---|---|
| 17 | Troll Knight | Ensis Entrance |
| 18 | Moonrithyll, Carian Knight | Castle Midpoint |
| 19 | Rellana, Twin Moon Knight | Ensis Moongazing Grounds |
Scadu Altus bosses:
| No. | Boss Name | Location |
|---|---|---|
| 20 | Troll Knight Apparition | Behind Castle Ensis |
| 21 | Black Knight Garrew | Fog Rift Fort |
| 22 | Fire Knight Queelign | Church Of The Crusade |
| 23 | Furnace Golem #3 | Highroad Encampment |
| 24 | Black Knight | Hill Overlooking Church Of The Crusade |
| 25 | Ralva The Great Red Bear | Lake East Of Highroad |
| 26 | Dryleaf Dane | Moorth Ruins |
| 27 | Ghostflame Dragon | Moorth Highway South |
| 28 | Black Knight Edredd | Fort Of Reprimand |
| 29 | Greater Potentate | Bonny Village |
| 30 | Greater Potentate | Bonny Village |
| 31 | Curseblade Labirith | Bonny Gaol |
| 32 | Furnace Golem #4 | Church District Highroad |
| 33 | Swordhand Of Night Anna | Finger Ruins Of Miyr |
| 34 | Jolán and Count Ymir | Cathedral Of Manus Metyr |
Jagged Peak bosses:
| No. | Boss Name | Location |
|---|---|---|
| 35 | Jagged Peak Drake | Foot Of The Jagged Peak |
| 36 | Jagged Peak Drake & Lesser Dragon | Foot Of The Jagged Peak |
| 37 | Ancient Dragon Senessax | Jagged Peak Mountainside |
| 38 | Bayle The Dread | Rest Of The Dread Dragon |
Cerulean Coast bosses:
| No. | Boss Name | Location |
|---|---|---|
| 39 | Demi-Human Queen Marigga | Cerulean Coast West |
| 40 | Ghostflame Dragon | Cerulean Coast Central Lake |
| 41 | Dancer Of Ranah | Southern Nameless Mausoleum |
Stone Coffin Fissure bosses:
| No. | Boss Name | Location |
|---|---|---|
| 42 | Misbegotten Crusader | Fissure Depths |
| 43 | Putrescent Knight | Garden Of Deep Purple |
| 44 | Thiollier | Garden Of Deep Purple |
Charo's Hidden Grave bosses:
| No. | Boss Name | Location |
|---|---|---|
| 45 | Tibia Mariner | Charo's Hidden Grave Entrance |
| 46 | Death Rite Bird | Gravebird Lake |
| 47 | Hippopotamus #1 | Lake Beyond River |
| 48 | Furnace Golem #5 | Charo's Hidden Grave West |
| 49 | Lamenter | Lamenter's Gaol |
Shadow Keep bosses:
| No. | Boss Name | Location |
|---|---|---|
| 50 | Golden Hippopotamus | Main Gate Plaza |
| 51 | Leda or Hornsent | Near Storehouse Entrance |
| 52 | Ulcerated Tree Spirit #3 | Church District |
| 53 | Ulcerated Tree Spirit #4 | Church District |
| 54 | Leda or Ansbach | Specimen Storehouse |
| 55 | Messmer The Impaler | Dark Chamber |
| 56 | Salza, Fire Knight Sage | Viaduct Minor Tower |
Scaduview bosses:
| No. | Boss Name | Location |
|---|---|---|
| 57 | Commander Gaius | Scaduview Entrance |
| 58 | Metyr, Mother Of Fingers | Finger Birthing Grounds |
Scadutree Base bosses:
| No. | Boss Name | Location |
|---|---|---|
| 59 | Scadutree Avatar | Scadutree Base |
Hinterland bosses:
| No. | Boss Name | Location |
|---|---|---|
| 60 | Tree Sentinel | Hinterland Bridge |
| 61 | Tree Sentinel | Hinterland Bridge |
| 62 | Fallingstar Beast | Hinterland Crater |
Recluses' River bosses:
| No. | Boss Name | Location |
|---|---|---|
| 63 | Furnace Golem #6 | Castle Watering Hole |
| 64 | Furnace Golem #7 | Ruins Of Unte |
| 65 | Rakshasa | Eastern Nameless Mausoleum |
| 66 | Hippopotamus #2 | Recluses' River Downstream Lake |
| 67 | Hippopotamus #3 | Recluses' River Downstream Lake |
| 68 | Jori, Elder Inquisitor | Darklight Catacombs |
Abyssal Woods bosses:
| No. | Boss Name | Location |
|---|---|---|
| 69 | Madding Hand | Woodland Trail |
| 70 | Midra, Lord Of Frenzied Flame | Midra's Manse |
Rauh Base bosses:
| No. | Boss Name | Location |
|---|---|---|
| 71 | Red Bear | Northern Nameless Mausoleum |
| 72 | Rugalea The Great Red Bear | Northwest Forest |
| 73 | Death Knight | Scorpion River Catacombs |
Ancient Ruins Of Rauh bosses:
| No. | Boss Name | Location |
|---|---|---|
| 74 | Crucible Knight Devonia | Rauh Ancient Ruins, East |
| 75 | Hippopotamus #4 | Rauh Ancient Ruins, East |
| 76 | Furnace Golem #8 | Rauh Ancient Ruins, West |
| 77 | Divine Beast Dancing Lion | Grand Stairway Temple |
| 78 | Romina, Saint Of The Bud | Church Of The Bud |
Enir-Ilim bosses:
| No. | Boss Name | Location |
|---|---|---|
| 79 | Divine Beast Warrior of Lightning | Outside Spiral Rise |
| 80 | Divine Beast Warrior of Frost | Spiral Rise Rooftops |
| 81 | Divine Beast Warrior of Wind | Outside Cleansing Chamber Anteroom |
| 82 | Leda, Dryleaf Dane, and Allies | Cleansing Chamber Anteroom |
| 83 | Promised Consort Radahn | Gate Of Divinity |
Which DLC bosses are required to beat Shadow Of The Erdtree?
Technically, you only need to defeat four bosses to beat the entire Elden Ring DLC. They are: Messmer, Romina, Leda (and gang), and Radahn. But while you only need to beat a handful of DLC bosses to beat Shadow Of The Erdtree, the Realm Of Shadow is absolutely jampacked with optional and fascinating bosses to discover.
Below we'll walk through all 83 DLC boss locations one by one, to make sure you don't miss a thing in Shadow Of The Erdtree.
Gravesite Plain boss locations

The Gravesite Plain, the starting area of the Elden Ring DLC, holds a total of 13 potential boss encounters - even more if you also count the two legacy dungeons in this region. The first couple of bosses you may encounter - the Furnace Golem and Blackgaol Knight - are in fact among the toughest of the region, so you may wish to return later once you're more powerful.
1. Logur The Beast Claw

| Location | South Woods |
| Boss Type | Named NPC |
| Difficulty | Easy |
| Reward(s) | Beast Claw, 3000 Runes |
Logur The Beast Claw is a good first boss to beat in Shadow Of The Erdtree. He can be found skulking about the forest in the south of the Gravesite Plain (just let him come to you once you're in there). He's not too tricky, as long as you're not overwhelmed by the new Beast Claw weapon's strange leaping combo attacks. He wears no armour, so takes a truckload of damage.
2. Blackgaol Knight

| Location | Western Nameless Mausoleum |
| Boss Type | Boss |
| Difficulty | Average |
| Reward(s) | Greatsword Of Solitude, Solitude Armor Set, 70000 Runes |
The Blackgaol Knight is actually quite a tough enemy by the standards of the Gravesite Plain, so you may wish to return once you've picked up a few Scadutree Fragments. Found inside the Western Nameless Mausoleum, this Knight switches from a massive Greatsword to a Repeating Crossbow to try and give you no time to heal. Fortunately, the Crossbow has a bit of a windup, and all his massive Greatsword swings are well telegraphed. Just don't expect to stagger him easily, as he has pretty high poise.
3. Furnace Golem #1

| Location | South of Three-Path Cross |
| Boss Type | Noteworthy Foe |
| Difficulty | Average |
| Reward(s) | Deflecting Hardtear, Furnace Visage, 9524 Runes |
Furnace Golems are a test of patience, in most cases. They're practically invulnerable to damage; ranged users need to shoot their face plate, while melee players need to make it stagger three times in a row for it to fall over, after which you can strike the face plate for massive damage. Read more in our guide on how to beat Furnace Golems. But the upshot is: I would probably leave this Furnace Golem until slightly later on, when you're a bit more powerful.
4. Ghostflame Dragon

| Location | Lake outside Belurat |
| Boss Type | Boss |
| Difficulty | Average |
| Reward(s) | Dragon Heart, Somber Ancient Dragon Smithing Stone, 100000 Runes |
The Ghostflame Dragon lies asleep in the lake next to Belurat, guarding the Great Katana on the ground beside it. It will awaken when you draw near, but don't fret; it's pretty much the same as the many other dragons you've no doubt beaten to reach the Land Of Shadow in the first place. Stay on horseback and slash patiently at its legs until it dies.
5. Demi-Human Swordmaster Onze

| Location | Belurat Gaol |
| Boss Type | Boss |
| Difficulty | Average |
| Reward(s) | Demi-Human Swordsman Yosh Spirit Ash, 80000 Runes |
Demi-Human Swordmaster Onze can be found at the end of the Belurat Gaol dungeon. He's a bit of a glass cannon; like all Demi-Humans, he has low poise and can be interrupted very easily, so stay aggressive and he should go down easy. If you give him space, though, he'll control the tempo with his teleporting combo attacks.
6. Ancient Dragon-Man (Invader)

| Location | Pillar Path |
| Boss Type | Named NPC |
| Difficulty | Easy |
| Reward(s) | 2531 Runes |
As you approach the Dragon's Pit in the Gravesite Plain, depending on the path you choose you'll be invaded by an Ancient Dragon-Man wielding a big ol' Great Katana. He hits decently hard if you let him, but otherwise this is a straightforward fight, not much to say except keep attacking and don't let him hit you.
7. Magma Wyrm

| Location | Dragon's Pit |
| Boss Type | Noteworthy Foe |
| Difficulty | Average |
| Reward(s) | Dragon Heart, Ancient Dragon Smithing Stone, 7718 Runes |
It may not be the actual boss of the Dragon's Pit, but the Magma Wyrm tucked away in a corner of this dungeon is still worth fighting and beating for the Dragon Heart and Ancient Dragon Smithing Stone it drops. It's the same as any other Magma Wyrm in Elden Ring - which is to say, very annoyingly capable of turning any environment into a pool of lava - but you shouldn't have too much trouble with it.
8. Ancient Dragon-Man (Boss)

| Location | Dragon's Pit |
| Boss Type | Boss |
| Difficulty | Easy |
| Reward(s) | Dragon-Hunter's Great Katana, 130000 Runes |
The true Ancient Dragon-Man is found at the end of the Dragon's Pit dungeon, and is a required boss for reaching certain areas of the Land Of Shadow, such as the Jagged Peak and Charo's Hidden Grave. The Ancient Dragon-Man's unique Great Katana has a powerful ranged attack similar to Moonveil, so make sure you're ready to dodge when it appears. The other thing to watch out for is his Dragon Communion ability, which summons a dragon's head to, well, eat you. Again, not too hard to avoid.
9. Death Knight

| Location | Fog Rift Catacombs |
| Boss Type | Boss |
| Difficulty | Average |
| Reward(s) | Death Knight's Twin Axes, Crimson Amber Medallion +3, 110000 Runes |
The Death Knights were once the most powerful of Godwyn The Golden's lot, and they defend him even in his new undead form as the Prince Of Death. You can find this Death Knight at the end of the Fog Rift Catacombs, unleashing all sorts of lightning attacks and basically acting like a tougher, faster Crucible Knight. Thankfully, it doesn't take much to break his poise, so keep up the pressure and he'll crack.
10. Ulcerated Tree Spirit #1

| Location | Ellac River |
| Boss Type | Noteworthy Foe |
| Difficulty | Average |
| Reward(s) | Horned Bairn, 18522 Runes |
Another Ulcerated Tree Spirit can be found down in Ellac River which separates the top and bottom halves of the Gravesite Plain. It's no different to any other Tree Spirit fight, although there's a chance you'll be attacked by a few rats while you fight it, depending on where the Tree Spirit draws you.
11. Chief Bloodfiend

| Location | Rivermouth Cave |
| Boss Type | Boss |
| Difficulty | Average |
| Reward(s) | Bloodfiend Hexer's Ashes, 80000 Runes |
The Rivermouth Cave in Ellac River is home to a Chief Bloodfiend, which is quite a bit bigger and tougher than your average garden variety Bloodfiend (which is already quite big and tough). Watch out for its sudden leap attacks, which seek to close distance when you least expect it. Otherwise, I'd treat this as a Runebear fight. Prepare for constant aggression and hard-hitting attacks, circle around when you can and strike the Chief from behind to whittle down its health.
12. Furnace Golem #2

| Location | Ellac River Downstream |
| Boss Type | Noteworthy Foe |
| Difficulty | Average |
| Reward(s) | Viridian Hidden Tear, Furnace Visage, 10238 Runes |
This second Furnace Golem can be found in Ellac River, in the large clearing just before the Cerulean Coast Site Of Grace. It's a carbon copy of the first, so just whale away at its feet until it falls over and hit the face plate for colossal damage.
13. Moore

| Location | Any Forager Brood Location |
| Boss Type | Named NPC |
| Difficulty | Average |
| Reward(s) | Moore's Bell Bearing, Verdigris Greatshield, Verdigris Armor Set |
Moore can potentially be fought at any of the locations of the Forager Brood (the non-violent Kindred Of Rot who give you Forager Brood Cookbooks upon interacting with them). If you kill two members of the Forager Brood, then Moore will invade you where you stand, and attempt to kill you using his giant Verdigris Greatshield and his Hefty Rot Pots.
Belurat boss locations

Belurat, Tower Settlement is one of the most important legacy dungeons in Shadow Of The Erdtree. Available by travelling west from the Three-Path Cross in the Gravesite Plain, there is a total of 3 bosses to be found in Belurat, among which is your first Remembrance Boss - the Divine Beast Dancing Lion.
14. Ulcerated Tree Spirit #2

| Location | Poison Lake |
| Boss Type | Noteworthy Foe |
| Difficulty | Average |
| Reward(s) | Immunizing Horn Charm +2, 18346 Runes |
Remember the Ulcerated Tree Spirit from base Elden Ring? Everyone's favourite camera-destroyer? Well, it's back. You can find it (among other places) in the swamp area of the Belurat legacy dungeon, and it's exactly as you remember it, only this time you need to kill it while standing in a poison swamp. Sounds hideous, but really it's not that big a deal. At this point, killing Tree Spirits should be second-nature.
15. Fire Knight Queelign

| Location | East Garden |
| Boss Type | Named NPC |
| Difficulty | Easy |
| Reward(s) | Crusade Insignia, 6530 Runes |
The irritating Fire Knight Queelign is an enemy you'll see a couple of times in this list, because he invades you in two separate locations. This one is located in the garden of Belurat, just beyond the Small Private Altar Site Of Grace. His Heavy Thrusting Sword is surprisingly quick, which may take you off-guard once or twice; but otherwise he's a real pushover, as with most NPC invader enemies.
16. Divine Beast Dancing Lion

| Location | Theatre Of The Divine Beast |
| Boss Type | Main Boss |
| Difficulty | Hard |
| Reward(s) | Remembrance Of The Dancing Lion, 120000 Runes |
Ah, your first Remembrance boss. The Divine Beast Dancing Lion is a fantastic boss fight, but a pretty challenging one thanks to its unusual movements and ghastly number of different attacks. This boss is constantly moving, which doesn't necessarily mean it's constantly attacking. Learn when it's safe to attack and heal, and the fight goes much easier.
The Divine Beast's second stage really tests your dodging skills, as it unleashes cascades of elemental attacks, switching between fire, lightning, cold, and smoke to catch you off-guard. Try not to get flustered; they're basically the same attacks and the same timings, just in different clothing.
Castle Ensis boss locations

Castle Ensis is likely the second legacy dungeon you'll reach in the DLC after Belurat, and it's the main gateway to the sprawling Scadu Altus beyond. Inside Castle Ensis you'll find 3 boss encounters, but the only really dangerous one is the Remembrance boss, Rellana.
17. Troll Knight

| Location | Ensis Entrance |
| Boss Type | Boss |
| Difficulty | Easy |
| Reward(s) | 8580 Runes, Somber Smithing Stone [8], Royal Magic Grease |
The first foe you'll encounter in Castle Ensis is a Carian Troll Knight, and while technically not a boss, it is a non-respawnable enemy which is more than capable of schooling unprepared Elden Ringers. Watch out for its area-of-effect attack when it plunges its sword into the ground. It's tougher to avoid than it looks.
18. Moonrithyll, Carian Knight

| Location | Castle Midpoint |
| Boss Type | Named NPC |
| Difficulty | Easy |
| Reward(s) | Moonrithyll's Knight Sword, 3000 Runes |
Moonrithyll, Carian Knight is waiting partway through Castle Ensis with his Glintblade Phalanxes and his big ol' Greatsword. Aside from his Phalanx Sorceries, he's a very straightforward and easy to defeat NPC miniboss; you should breeze right past him. I would advise making sure the teleporting nobles just before him are already dealt with, however.
19. Rellana, Twin Moon Knight

| Location | Ensis Moongazing Grounds |
| Boss Type | Main Boss |
| Difficulty | Hard |
| Reward(s) | Remembrance Of The Twin Moon Knight, 240000 Runes |
Rellana, Twin Moon Knight, is the main boss of Castle Ensis, and a Remembrance holder - the equivalent of a Shardbearer in base Elden Ring. She provides quite the challenge with her hard-to-read attack animations, long reach, and powerful combos. Not to mention, in her second phase she ignites her swords - one magic, one fire - and starts casting hefty ranged attacks while also closing the distance and attacking in melee range.
My advice would be to roll into and around her rather than away in most cases, and to prepare to jump three times in quick succession when Rellana does her unique double moon attack. Otherwise, it's pretty much game over immediately.
Scadu Altus boss locations

Predictably, Scadu Altus holds the most bosses of any region in the DLC, topping out at 15 (and that's not even counting those in Recluses' River). Of these, the most dangerous bosses are the Furnace Golems and the Ghostflame Dragon to the south of the Moorth Ruins.
20. Troll Knight Apparition

| Location | Behind Castle Ensis |
| Boss Type | Boss |
| Difficulty | Easy |
| Reward(s) | Smithing Stone [8], 8775 Runes |
Once you reach Scadu Altus you can circle round behind Castle Ensis and find a Troll Knight Apparition in a small lake, guarding an Imbued Sword Key portal. It's functionally identical to the Troll Knight you find at the beginning of Castle Ensis, so you should know what to do here.
21. Black Knight Garrew

| Location | Fog Rift Fort |
| Boss Type | Boss |
| Difficulty | Average |
| Reward(s) | Black Steel Greatshield, 80000 Runes |
The rather disturbing Black Knight Garrew heads up the Fog Rift Fort just south of the Scadu Altus West Grace. I say "disturbing", because while Garrew is identical to any old hammer-wielding Black Knight in every other way, he also has a bizarre attack where he conjures a big toad-like maw to send a long tongue at you to try and reel you in. It's... it's very weird.
22. Fire Knight Queelign (Second Encounter)

| Location | Church Of The Crusade |
| Boss Type | Named NPC |
| Difficulty | Easy |
| Reward(s) | Ash Of War: Flame Skewer, Prayer Room Key, 6530 Runes |
Queelign's second invasion occurs in the Church Of The Crusade on the western edge of Scadu Altus, just beyond Castle Ensis. He's pretty much exactly the same here as he was in Belurat. The only reason this fight might be difficult is if you don't respect the speed and range of that Heavy Thrusting Sword category.
Kill Queelign in both locations (it doesn't matter which one first), and he'll also drop the Prayer Room Key, which you can use to finish his minor questline later on in Shadow Keep - and potentially get his Heavy Thrusting Sword for yourself!
23. Furnace Golem #3

| Location | Highroad Encampment |
| Boss Type | Noteworthy Foe |
| Difficulty | Average |
| Reward(s) | Crimsonburst Dried Tear, Furnace Visage, 10714 Runes |
Oh look, it's another Furnace Golem. Yes, they're used quite a lot in Shadow Of The Erdtree. Really you should be thankful! At least they're not too tricky to beat once you know how, and they give you a new Tear for your Flask Of Wondrous Physick each time! This one is found in the middle of a Messmer Soldier camp, but I wouldn't worry. Just bait the Furnace Golem into unleashing a few area-of-effect attacks and the Soldiers will die very quickly.
24. Black Knight

| Location | Hill overlooking Church Of The Crusade |
| Boss Type | Noteworthy Foe |
| Difficulty | Average |
| Reward(s) | Black Steel Twinblade, 4446 Runes |
Turn left when you're just past the main encampment on the Scadu Altus highroad, and you'll see another section of camp, with a Twinblade-wielding Black Knight at the top. I find the Twinblade Black Knights a bit harder than the Hammer-wielding ones, because although they don't hit as hard, they're faster and harder to dodge. What's nice though is that if you kill this one, you get its Black Steel Twinblade for yourself.
25. Ralva The Great Red Bear

| Location | Lake east of Highroad |
| Boss Type | Boss |
| Difficulty | Average |
| Reward(s) | Pelt Of Ralva, 180000 Runes |
If you hated the Runebears from base Elden Ring, I've got some bad news for you. They're back, in a hot red variety. Ralva The Great Red Bear can be found in the middle of a foresty lake in Scadu Altus, and he's just as aggressive as any Runebear you may have fought before. He doesn't really have any neat tricks up his sleeve, just biting and slashing and roaring as per usual. Not easy, but not exceptionally tough by DLC standards, either.
26. Dryleaf Dane

| Location | Moorth Ruins |
| Boss Type | Named NPC |
| Difficulty | Easy |
| Reward(s) | Dryleaf Arts, Dane's Hat |
If you want to make use of the new Hand-To-Hand combat style in Elden Ring: Shadow Of The Erdtree, Dryleaf Dane in the Moorth Ruins is the man to talk to. Or rather, bow to. Perform the "May The Best Win" Gesture in front of him and he'll fight you one-on-one. He's very aggressive, and his Dryleaf Arts hit decently hard, but honestly, as with most NPC fights in Elden Ring, there's not much you need fear here.
27. Ghostflame Dragon

| Location | Moorth Highway South |
| Boss Type | Boss |
| Difficulty | Average |
| Reward(s) | Dragon Heart, Somber Ancient Dragon Smithing Stone, 120000 Runes |
Now this is quite a spectacle. Head down the road from the Moorth Ruins and you'll soon see a Ghostflame Dragon fighting an entire camp of Messmer Soldiers and Messmer Knights. Those Knights are no joke, particularly in numbers, so I would wait on the periphery for a while and enjoy the show before going in for the dragon kill once things have calmed down a bit.
28. Black Knight Edredd

| Location | Fort Of Reprimand |
| Boss Type | Boss |
| Difficulty | Average |
| Reward(s) | Ash Of War: Aspects Of The Crucible: Wings, 4446 Runes |
The Twinblade-wielding Black Knight Edredd can be found near the top of the Fort Of Reprimand, on the southern border of Scadu Altus. He's exactly the same as any other Twinblade Black Knight you may have encountered; high poise, hits hard, not the easiest to dodge, but doesn't have anything particularly dangerous to offer either. I made use of the Wing Stance Skill on Milady to close the distance quickly, to great effect.
29. Greater Potentate

| Location | Bonny Village |
| Boss Type | Named NPC |
| Difficulty | Easy |
| Reward(s) | 3000 Runes |
Bonny Village is home to a great many Shadow Undead, and a couple of nearly-nude Greater Potentates armed with massive iron cleavers. They may look intimidating, but - much like Logur The Beast Claw back in the Gravesite Plain - their lack of armour makes them go down very easily. They attempt to tip the scales in their favour by casting an Incantation which gives them health upon landing attacks, but it's not enough to counter an aggressive playstyle.
30. Greater Potentate #2

| Location | Bonny Village |
| Boss Type | Named NPC |
| Difficulty | Easy |
| Reward(s) | 3000 Runes |
Across the first bridge in Bonny Village, you'll find another Greater Potentate, a carbon copy of the first. Again, just keep slashing away and avoiding its big, telegraphed attacks, and you'll have no trouble here. Bonny Village just doesn't have much to offer in the way of a challenge for a Tarnished as mighty as you.
31. Curseblade Labirith

| Location | Bonny Gaol |
| Boss Type | Boss |
| Difficulty | Average |
| Reward(s) | Curseblade Meera Spirit Ash, 100000 Runes |
Curseblade Labirith is found at the end of Bonny Gaol - or is he? Curseblades are always dangerous, but this one spends a good portion of the fight invisible, much like the Black Knife Assassins of base Elden Ring. Use the Sentry's Torch to reveal its whereabouts, and then carefully roll around its attacks and slash at it from behind to finish it off.
32. Furnace Golem #4

| Location | Church District Highroad |
| Boss Type | Noteworthy Foe |
| Difficulty | Average |
| Reward(s) | Cerulean-Sapping Cracked Tear, Furnace Visage, 10714 Runes |
As you make your way north after crossing through Bonny Village, you'll encounter another Furnace Golem, carefully located next to an elevated position from which you can throw Hefty Fire/Furnace Pots into its basket. Have fun!
33. Swordhand Of Night Anna

| Location | Finger Ruins Of Miyr |
| Boss Type | Named NPC |
| Difficulty | Easy |
| Reward(s) | Claws Of Night |
If you progress Ymir's quest a short way, then there'll come a time when you find he isn't on his throne at the Cathedral Of Manus Metyr, and you can interact with the throne to reveal a passage into the hidden Finger Ruins Of Miyr. There you'll be assailed by Swordhand Of Night Anna and her Claws Of Night. Sounds dangerous, but it really isn't. She's an ordinary NPC enemy, go kill her.
34. Swordhand Of Night Jolán and Count Ymir

| Location | Cathedral Of Manus Metyr |
| Boss Type | Named NPC |
| Difficulty | Easy |
| Reward(s) | Ymir's Bell Bearing, Maternal Staff, High Priest Armor Set |
Once you return to the Cathedral Of Manus Metyr after defeating Metyr, Mother Of Fingers, you'll be invaded first by Swordhand Of Night Jolán and then Count Ymir himself, for two rather different NPC fighting styles back-to-back. Honestly though, after Metyr, neither enemy can trouble you much as long as you are able to dodge their most dangerous attacks.
Jagged Peak boss locations

The gigantic Jagged Peak region is actually only home to four boss encounters, all of them draconic in nature. By far the most challenging - and the main reason to enter the region in the first place - is Bayle The Dread, who aside from the final boss is by far the hardest fight in the DLC in my opinion.
35. Jagged Peak Drake

| Location | Foot Of The Jagged Peak |
| Boss Type | Boss |
| Difficulty | Average |
| Reward(s) | Dragon Heart, Dragonscale Flesh, 90000 Runes |
The first dragon you'll find in the Jagged Peak region is a Drake surrounded by its fallen brethren just beyond the exit of the Dragon's Pit dungeon. These Drakes act as a bit of a cross between regular dragons and Ancient Dragons from the base game. They're mostly the same as regular dragons, but they'll occasionally unleash red lightning attacks to try and put Torrent through his paces.
36. Jagged Peak Drake & Lesser Dragon

| Location | Foot Of The Jagged Peak |
| Boss Type | Boss |
| Difficulty | Average |
| Reward(s) | Dragon Heart, Dragonscale Flesh, 120000 Runes |
Climb a short distance up the mountain from the Foot Of The Jagged Peak, and you'll come across two Drakes locked in battle. The damage they do to each other makes this fight much easier than it might have; feel free to safely add your own damage when possible, and finish off the victor afterwards.
37. Ancient Dragon Senessax

| Location | Jagged Peak Mountainside |
| Boss Type | Boss |
| Difficulty | Average |
| Reward(s) | Ancient Dragon Smithing Stone, Somber Ancient Dragon Smithing Stone, 200000 Runes |
There's exactly one Ancient Dragon fight in Shadow Of The Erdtree (unless you count the next boss in this list), and it's Senessax, a predictably mighty foe who can be found very near the top of the Jagged Peak. Senessax doesn't do much different from Lansseax from the Altus Plateau in base Elden Ring; Senessax is just tougher, and deals more damage. Give those lightning attacks a wide berth!
38. Bayle The Dread

| Location | Rest Of The Dread Dragon |
| Boss Type | Boss |
| Difficulty | Very Hard |
| Reward(s) | Heart Of Bayle, 490000 Runes |
I would call Bayle the second-hardest boss in Shadow Of The Erdtree, beaten only by the DLC's final boss. Hulkingly massive and with a number of extremely powerful and hard-to-avoid area-of-effect attacks, Bayle is by no means meant to be defeated the moment you first come across him at the top of the Jagged Peak. I'd advise coming back later on when you've upped your Scadutree Blessing Level to 15-20.
You can summon Igon into the arena to fight Bayle, which definitely helps as long as Bayle decides to focus him before you. Generally I've found sticking to the meatiest part of Bayle's tail and hitting him there does a good job whittling down his health. Just prepare to spend a large part of his second phase dodging attacks while he flies around the arena.
Cerulean Coast boss locations

The gorgeous Cerulean Coast can be accessed via Ellac River in the Gravesite Plain. It only holds a total of 3 fairly bosses itself, among them another fearsome Ghostflame Dragon.
39. Demi-Human Queen Marigga

| Location | Cerulean Coast West |
| Boss Type | Boss |
| Difficulty | Easy |
| Reward(s) | Star-Lined Sword, 100000 Runes |
Demi-Human Queen Marigga likes to sit around in the northwest corner of the Cerulean Coast, surrounded by adoring Demi-Humans. It's a very easy fight, as long as you stay up close and personal with Marigga and keep abusing her low poise. If you're struggling not to be overwhelmed by numbers during this fight, just stay on Torrent while you fight, and you should be past this boss in no time.
40. Ghostflame Dragon

| Location | Cerulean Coast Central Lake |
| Boss Type | Boss |
| Difficulty | Average |
| Reward(s) | Dragon Heart, Somber Ancient Dragon Smithing Stone |
This conniving Ghostflame Dragon will fly down towards you as you approach the edge of the lake in eastern Cerulean Coast, in a manner very reminiscent of Agheel way back in Limgrave. This Ghostflame Dragon I'd say is a tad harder than the others, because it conjures skeletons to pester you while you fight it. Thankfully, it has a habit of killing its own allies with its area-of-effect ghostflame attacks.
41. Dancer Of Ranah

| Location | Southern Nameless Mausoleum |
| Boss Type | Boss |
| Difficulty | Average |
| Reward(s) | Dancing Blade, Dancer's Armor Set, 80000 Runes |
The exquisitely-dressed Dancer Of Ranah inside the Southern Nameless Mausoleum can be reached using the cave on the shore right next to the island where the Mausoleum can be found. The Dancer herself has an interesting set of attacks which consist of very long chains of fluid strikes. Fortunately, she can be broken out of her flow with an easy jump-attack, which makes what could have been a tricky fight much easier.
Stone Coffin Fissure boss locations

The Stone Coffin Fissure sub-region found at the very bottom of the Cerulean Coast is home to 3 boss encounters. Prime among them is the Putrescent Knight, a powerful Remembrance boss found guarding the Garden Of Deep Purple at the end of the Fissure.
42. Misbegotten Crusader

| Location | Fissure Depths |
| Boss Type | Noteworthy Foe |
| Difficulty | Average |
| Reward(s) | Multilayered Ring Of Light, 7066 Runes |
Just before you reach the end of the Stone Coffin Fissure, you'll encounter a glowing Misbegotten Crusader - a near carbon copy of the boss you may have encountered back in the Cave Of The Forlorn in the base game. He's a rough sort, with long swings and combos that can easily kill you or knock you off the cliff edge if you're not careful. But kill him, and you'll be rewarded with the Multilayered Ring Of Light Incantation.
43. Putrescent Knight

| Location | Garden Of Deep Purple |
| Boss Type | Main Boss |
| Difficulty | Hard |
| Reward(s) | Remembrance Of Putrescence, 220000 Runes |
Prepare yourself well, because this is one of the tougher bosses in the Elden Ring DLC. From the Fissure Depths Grace, drop down off the head of the giant statue in front and you'll soar down into one of the most beautiful boss arenas in the game. Sadly, the Putrescent Knight won't let you appreciate it for long.
Key to remember is this: the Putrescent Knight always looks like it's attacking, but often you actually have time to down a heal or two. Don't try and get any attacks in while the Knight is off his horse - just focus on dodging repeatedly. Try to roll past its attacks and damage the horse's hind quarters from the side, and you'll have a slightly easier time taking down this Remembrance boss.
44. Thiollier

| Location | Garden Of Deep Purple |
| Boss Type | Named NPC |
| Difficulty | Easy |
| Reward(s) | St. Trina's Smile |
If you're looking to complete Thiollier's questline, eventually you're going to have to fight him. The reason this comes about is that if you imbibe enough of St. Trina's Nectar in the Garden Of Deep Purple after defeating the Putrescent Knight, then she'll start to speak to you. And Thiollier doesn't like that she's speaking to you instead of him. So he invades, and attempts to use his Deadly Poison Perfume Bottle to subdue you.
Fortunately, you can more or less just ignore his attacks and cut him down with a few swings. As he's remarked to you previously, Thiollier isn't all that strong.
Charo's Hidden Grave boss locations

Charo's Hidden Grave is a sub-region of the Cerulean Coast, which can only be accessed by jumping over the giant dragon corpse at the Grand Cathedral Of Dragon Communion. The standard here is much higher than in the Cerulean Coast, with 5 bosses, all of whom can give you some serious trouble - particularly that darn Death Rite Bird.
45. Tibia Mariner

| Location | Charo's Hidden Grave Entrance |
| Boss Type | Noteworthy Foe |
| Difficulty | Average |
| Reward(s) | Tibia's Cookbook, 9959 Runes |
Tibia Mariners are usually extremely easy, I've found. This one's certainly easy to find, once you've figured out how to get to Charo's Hidden Grave. What makes this one a bit more worthy of your time is the fact that it summons a Revenant - one of the most aggressive and least fun bosses in Elden Ring - to hound you when you get near.
The Mariner itself is dead easy, so really the true boss is the Revenant. Fortunately, it has a huge weakness. Cast a healing spell near it, and it'll take huge damage and be stunned ready for a critical hit.
46. Death Rite Bird

| Location | Gravebird Lake |
| Boss Type | Boss |
| Difficulty | Hard |
| Reward(s) | Ash Of War: Ghostflame Call, 230000 Runes |
This absolute bastard bird, as well all its kin in the base game, only appears during the night. Even the measliest Death Rite Bird is worthy of respect; this one is extra tough, because it is surrounded by Gravebirds that hound you and keep you distracted. My advice is to fight on foot, take things slow, and make maximum use of Holy damage to chunk down the Death Rite Bird's health whenever you see an opening.
47. Hippopotamus #1

| Location | Lake Beyond River |
| Boss Type | Noteworthy Foe |
| Difficulty | Average |
| Reward(s) | Scadutree Fragment, 9576 Runes |
There are a few Hippopotamus enemies scattered about the Land Of Shadow, and in my opinion they act kind of like smaller, more compact Ulcerated Tree Spirits. Lots of charging around, big swinging attacks, and so on. They look intimidating, but they're not actually that difficult, and they can be staggered fairly easily. Look out for this one in the middle of the lake near the centre of Charo's Hidden Grave.
48. Furnace Golem #5

| Location | Charo's Hidden Grave West |
| Boss Type | Noteworthy Foe |
| Difficulty | Average |
| Reward(s) | Glovewort Crystal Tear, Furnace Visage, 10857 Runes |
The Furnace Golem found at the far west side of Charo's Hidden Grave has armoured feet, so the usual method of attacking the feet until it falls over will not work. Fortunately, it hangs out right next to a ledge where you can get up and look down into its flaming basket. Throw a few Hefty Fire Pots in the basket and it'll go down in no time. Just make sure you time your throws right!
49. Lamenter

| Location | Lamenter's Gaol |
| Boss Type | Boss |
| Difficulty | Average |
| Reward(s) | Lamenter's Mask, 160000 Runes |
The Lamenter is a very curious foe. The namesake of the Lamenter's Gaol in the north of Charo's Hidden Grave, this creature does a lot of sobbing, and a lot of disappearing, and a hell of a lot of cloning itself. There's not much danger here, but it does take time tracking down and dealing damage to the right Lamenter, so this fight is a bit of a test of one's patience.
Shadow Keep boss locations

One of the most pivotal legacy dungeons in the DLC, the Shadow Keep is home to Messmer The Impaler himself, alongside a host of other lesser bosses (7 in total). Other than Messmer, who is predictably the toughest, the Golden Hippopotamus defending the main entrance to the Shadow Keep is no slouch either.
50. Golden Hippopotamus

| Location | Main Gate Plaza |
| Boss Type | Boss |
| Difficulty | Average |
| Reward(s) | Aspects Of The Crucible: Thorns, Scadutree Fragment x2, 200000 Runes |
Before you take two steps through the Shadow Keep main entrance, you'll be assaulted by another Hippopotamus, this time of the Gold variety. The first phase is the same as any Hippo you've previously fought; but once it gets down to half-health, it'll grow an arrangement of golden spines which it uses to rain annoyance down upon you. Again, expect a very Ulcerated-Tree-Spirit-esque fight.
51. Leda or Hornsent

| Location | Near Storehouse Entrance |
| Boss Type | Named NPC |
| Difficulty | Average |
| Reward(s) | Falx, Hornsent's Armor Set OR Leda's Rune |
This optional fight is potentially part of a quest crossover between Needle Knight Leda and the Hornsent. If you progress Leda's quest to the point where after Miquella's charm lifts she starts hunting down the unworthy among her group, you then have the choice to interfere in their fight against one another via summon signs in the Shadow Keep. Neither foe is particularly challenging, especially with an ally to back you up. Choose who you prefer (or don't!), and enjoy. And if you want more information, check out our guide on whether you should assist Leda or the Hornsent.
52. Ulcerated Tree Spirit #3

| Location | Church District |
| Boss Type | Noteworthy Foe |
| Difficulty | Average |
| Reward(s) | Mantle Of Thorns, 22218 Runes |
There are a couple of Ulcerated Tree Spirits swimming about in the drowning Church District beside the Shadow Keep. To fight them, you need to do some rooftop parkouring until you reach a big wheel you can turn to drain the district, allowing you to reach the ground at last. This Ulcerated Tree Spirit attacks you as you approach the tree in the circular garden area beside the Sunken Chapel Grace.
53. Ulcerated Tree Spirit #4

| Location | Church District |
| Boss Type | Noteworthy Foe |
| Difficulty | Average |
| Reward(s) | Iris Of Occultation, 22218 Runes |
You know how I said there are two Ulcerated Tree Spirits in the Church District? This is the other one, located slightly northeast of the first. In terms of the boss fight itself, the two are exactly identical. The only reason this particular Ulcerated Tree Spirit is special is because it drops an Iris Of Occultation on death.
54. Leda or Ansbach

| Location | Specimen Storehouse |
| Boss Type | Named NPC |
| Difficulty | Average |
| Reward(s) | Ansbach's Longbow, Ansbach's Armor Set OR Leda's Rune |
If you continue with Leda's bloodthirsty mission of weeding out the unfaithful, then she will eventually turn on Ansbach within the Specimen Storehouse in the Shadow Keep - and just as with Leda vs the Hornsent, you have the option to join their duel on either side via summoning signs. Ansbach gives you the greatest challenge for sure - he's actually very annoying at times with his fast-firing and very dangerous bow attacks. But if you get him in a corner, he's toast. And Leda really isn't too difficult either - she's basically the same as any other NPC invader.
55. Messmer The Impaler

| Location | Dark Chamber |
| Boss Type | Main Boss |
| Difficulty | Very Hard |
| Reward(s) | Remembrance Of The Impaler, Messmer's Kindling, 400000 Runes |
Ah, here he is. Poster-child Messmer The Impaler can be found at the top of the Shadow Keep, and he's one of just a very small shortlist of actually required bosses in the DLC. To no one's surprise, he's very tough. He supplements his elegant slashes and thrusts with flame attacks that give him some quite astonishing range, and his second phase is... well, it's a lot.
Weirdly though, I found it easier to get to grips with that second phase than with his first. It's scary as hell, and there's a lot going on on-screen, but the dodge timing actually isn't that difficult once you understand what you're seeing. Stick with it; it might end up taking less time than you think to defeat Messmer. He ain't no Malenia.
56. Salza, Fire Knight Sage

| Location | Viaduct Minor Tower |
| Boss Type | Noteworthy Foe |
| Difficulty | Easy |
| Reward(s) | Salza's Hood, Rain Of Fire, 8041 Runes |
As you make your way down the bridge from the Shadow Keep's West Rampart Site Of Grace, you'll soon find yourself under fire from some sort of Messmerfire rain Sorcery. Turns out, Salza, Fire Knight Sage is standing at the entrance to the Viaduct Minor Tower at the end of the bridge, and is being a nuisance. He's not too hard to deal with though; once you get close, he's like every other Fire Knight you've dealt with in the Shadow Keep. Hard by ordinary enemy standards, but not by boss standards.
Scaduview boss locations

Scaduview is a small area around the back side of the Shadow Keep, and it's home to two powerful Remembrance bosses: Commander Gaius, and Metyr, Mother Of Fingers. However, you can't reach Metyr via Scaduview - instead you must complete Ymir's quest by ringing the bell beneath the Cathedral Of Manus Metyr to transport yourself to this particular boss arena.
57. Commander Gaius

| Location | Scaduview Entrance |
| Boss Type | Main Boss |
| Difficulty | Hard |
| Reward(s) | Remembrance Of The Wild Boar Rider, 230000 Runes |
Commander Gaius is a very tough foe, almost to the same extent as Messmer himself, albeit in a very different way. Gaius is found in front of the Shadow Keep, Back Gate Grace, and his boss fight is like a Tree Sentinel fight cranked up to 11, where the horse (or in this case, boar) does as much damage as the rider.
As if that weren't enough, Gaius is also a master of Gravity magic (much like Radahn in base Elden Ring), and in his second phase he'll launch himself and his mount into the air to deliver spectacular crashing blows down upon you. But keep up the pressure, and you'll find it's not too difficult to stagger and crit him.
58. Metyr, Mother Of Fingers

| Location | Finger Birthing Grounds |
| Boss Type | Main Boss |
| Difficulty | Average |
| Reward(s) | Remembrance Of The Mother Of Fingers, 420000 Runes |
Progress to the end of Count Ymir's questline and you'll come face to face with Metyr, Mother Of Fingers - fascinatingly, the "mother" of all Two Fingers and Fingercreepers in Elden Ring. This Remembrance boss has plenty of powerful attacks, and is particularly difficult to face from the side. Fortunately, she has a giant weak spot in the form of her chest, which is very susceptible to slashing and bleed attacks in my experience.
In Metyr's second phase, she'll conjure a singularity and use it to fire off all sorts of horrendous area-of-effect attacks, so give her some space and respect in this second phase, and pick the right moment to get up close to finish her off.
Scadutree Base boss locations

The Scadutree Base is a small extra area attached to the Shadow Keep's Church District via a path known as the Tree-Worship Passage. This area is little more than a boss arena housing a single Remembrance Boss: the Scadutree Avatar.
59. Scadutree Avatar
| Location | Scadutree Base |
| Boss Type | Main Boss |
| Difficulty | Hard |
| Reward(s) | Remembrance Of The Shadow Sunflower, Miquella's Great Rune, 260000 Runes |
The Scadutree Avatar is a thrilling boss to fight. Located at the base of the Scadutree itself (accessible via the Church District of the Shadow Keep), its uniqueness lies in the fact that you need to "kill" it three times before it dies properly. Before that, each time you take it out, it'll disappear and then tear its way back out of the ground with a new, more advanced moveset.
Pay particular attention for when it rears back, because that means it's about to do an arena-spanning charge attack (or multiple, one after the other). The other really dangerous move is when it throws bleed-inducing roots at you. Dodge to the side as if your life depends on it, because it probably does.
Hinterland boss locations

The Hinterland is a very tricky area to reach. It can only be accessed by performing the "O Mother" Gesture (found north of Bonny Village) in front of the statue of Marika by the Shadow Keep Back Gate. Beyond this secret doorway, you'll find just 3 boss encounters in the entirety of the Hinterland - two Tree Sentinels and a Fallingstar Beast.
60. Tree Sentinel

| Location | Hinterland Bridge |
| Boss Type | Boss |
| Difficulty | Average |
| Reward(s) | Blessing Of Marika, 120000 Runes |
A short way into the Hinterland (Hinterland? What Hinterland? I suggest you read our guide on how to get to the Hinterland), you'll come across a pair of Tree Sentinels. Thing is, if you're in the Hinterland you've probably progressed quite far into Shadow Of The Erdtree, and something like a Tree Sentinel won't give you much trouble.
61. Tree Sentinel #2

| Location | Hinterland Bridge |
| Boss Type | Boss |
| Difficulty | Average |
| Reward(s) | Blessing Of Marika, 120000 Runes |
It may have ended up a bit of a challenge if the two Tree Sentinels in the Hinterland attacked you together, but they won't (unless you deliberately draw aggro from both at once). Pick one off, then pick the other off, and keep going on your merry way through one of the prettiest biomes in Elden Ring.
62. Fallingstar Beast

| Location | Hinterland Crater |
| Boss Type | Boss |
| Difficulty | Average |
| Reward(s) | Gravitational Missile, 170000 Runes |
The most dangerous foe in the Hinterland is the Fallingstar Beast, which spawns when you enter its crater to the north. It's identical to the Fallingstar Beasts from the base game, so you should know what you're getting into, but that doesn't make it any less challenging. Aim for the head or the base of the tail, and fight on foot rather than on horseback for an easier time dodging its gravitational and tail attacks.
Recluses' River boss locations

To enter Recluses' River, you must transport yourself to the Castle Watering Hole via the secret passage inside the Shadow Keep. To learn more, you can follow our guide on how to reach the Abyssal Woods, which covers Recluses' River as well. Inside the river you'll find a surprising number of bosses - 6 in total, including 2 Hippopotamus next to each other.
63. Furnace Golem #6

| Location | Castle Watering Hole |
| Boss Type | Noteworthy Foe |
| Difficulty | Average |
| Reward(s) | Oil-Soaked Tear, Furnace Visage, 13773 Runes |
You know where those two summon signs were for Leda vs the Hornsent? Well there's a ladder right there. Go through the waterfall, then hit the wall next to the painting for a secret passage to the Castle Watering Hole - a veritable cemetery of broken-down Furnace Golems. Except this one isn't broken down. You know what to do.
64. Furnace Golem #7

| Location | Ruins Of Unte |
| Boss Type | Noteworthy Foe |
| Difficulty | Average |
| Reward(s) | Bloodsucking Cracked Tear, Furnace Visage, 13773 Runes |
If you've read our guide on how to get inside the Ruins Of Unte, you know that there's something special about this Furnace Golem. It's another broken down Golem, but this one is blocking the entrance to the Ruins, so you need to wake it up by throwing a Hefty Furnace Pot into its basket. After that, of course, you need to defeat it. Fortunately this is likely the eighth such Furnace Golem you've encountered, so killing these guys should be second nature by now.
65. Rakshasa

| Location | Eastern Nameless Mausoleum |
| Boss Type | Boss |
| Difficulty | Average |
| Reward(s) | Rakshasa's Great Katana, Rakshasa Armor Set, 90000 Runes |
Rakshasa is holed up inside the Eastern Nameless Mausoleum, which is the most hidden of the four Mausoleums in the DLC. You'll need to follow the path that branches off near the Recluses' River Downstream Grace to reach it; inside, you'll find that Rakshasa is a fairly ordinary Great Katana-wielding NPC enemy, albeit one who hits like a truck (and once you see the effect of his Armor Set, that'll make sense).
66. Hippopotamus #2

| Location | Recluses' River Downstream Lake |
| Boss Type | Noteworthy Foe |
| Difficulty | Average |
| Reward(s) | Scadutree Fragment, 11040 Runes |
Another day, another giant angry Hippo to kill, isn't that how the saying goes? Make your way down the cliffside ledges from the Recluses' River Downstream Grace, and you'll reach a lake with two more of these bad boys, each of which offers you a Scadutree Fragment on death.
67. Hippopotamus #3

| Location | Recluses' River Downstream Lake |
| Boss Type | Noteworthy Foe |
| Difficulty | Average |
| Reward(s) | Scadutree Fragment, 11040 Runes |
Yet another Hippopotamus awaits you slightly further into the lake from the first (above). The only real danger they pose is if you wander too far near the territory of the other while you're fighting the first, and they band together against you. Otherwise, they're fairly straightforward fights at this point of the DLC.
68. Jori, Elder Inquisitor

| Location | Darklight Catacombs |
| Boss Type | Boss |
| Difficulty | Hard |
| Reward(s) | Barbed Staff-Spear, 260000 Runes |
Jori, Elder Inquisitor is probably the toughest of all the dungeon bosses in Shadow Of The Erdtree. And that makes sense, because he's also arguably the most important, seeing as he gatekeeps an entire region of the Land Of Shadow: the Abyssal Woods.
Found at the end of the Darklight Catacombs, Jori is a very annoying foe for melee players because he loves to teleport away from you, fire ranged holy attacks that are difficult to avoid, and - worst of all - summons lots of helpers to fire even more holy attacks at you. Defeating Jori is more of a test of patience than any other dungeon boss.
Abyssal Woods boss locations

The terrifying Abyssal Woods are home not only to the dangerous Aging Untouchable Winter Lanterns, but also an NPC boss encounter and a magnificent Remembrance boss: Midra, Lord Of Frenzied Flame.
69. Madding Hand

| Location | Woodland Trail |
| Boss Type | Boss |
| Difficulty | Easy |
| Reward(s) | Madding Hand, 3000 Runes |
The Madding Hand is an unassuming NPC that attacks you down a specific path of the Abyssal Woods. He wields his namesake Fist weapon, the Madding Hand, which basically means he inflicts madness buildup with each hit. Otherwise, he's another very straightforward NPC miniboss. Slash at him until he bleeds and dies, and beware his Flame Of Frenzy AOE attack.
70. Midra, Lord Of Frenzied Flame

| Location | Midra's Manse |
| Boss Type | Main Boss |
| Difficulty | Hard |
| Reward(s) | Remembrance Of The Lord Of Frenzied Flame, 410000 Runes |
Now here's an awesome boss. Midra is the proprietor of Midra's Manse, the main landmark inside the Abyssal Woods. He's also a failed Lord Of The Frenzied Flame, and one of the toughest bosses in Shadow Of The Erdtree. Long reach, colossal area-of-effect attacks, one-shot potential, and probably a more intimidating presence than any other boss in the game. This guy is worth the trek through the Abyssal Woods.
Unexpectedly, this boss probably is the one that feels most like Malenia while fighting him. I wouldn't quite put him on her difficulty level, but he's not far off at all.
Rauh Base boss locations

The Rauh Base is accessed by heading through the cave in the lake north of Moorth Ruins in Scadu Altus. Here you'll find a total of 3 boss encounters, all of which are about as dangerous as each other, really.
71. Red Bear

| Location | Northern Nameless Mausoleum |
| Boss Type | Boss |
| Difficulty | Average |
| Reward(s) | Red Bear's Claw, Iron Rivet Armor Set, 80000 Runes |
The so-called Red Bear is anything but. Found within the Northern Nameless Mausoleum (which is accessible via a Spiritspring near the Temple Town Ruins), he's an ordinary guy wearing Beast Claws - essentially an upgraded version of Logur, the first boss in this list. The Red Bear admittedly can do massive damage with those Claws if you let him land a combo on you, but if you stay on the move and close the distance only when you know you can land your attack first, then it shouldn't be too tricky a fight.
72. Rugalea The Great Red Bear

| Location | Northwest Forest |
| Boss Type | Boss |
| Difficulty | Average |
| Reward(s) | Roar Of Rugalea |
Rugalea The Great Red Bear can be located by following the Scorpion River that cuts through Rauh Base. Rugalea is pretty much identical to Ralva from Scadu Altus, albeit slightly tougher due to region scaling. It's extremely aggressive and doesn't give you much time to heal, so be prepared to keep dodging.
73. Death Knight

| Location | Scorpion River Catacombs |
| Boss Type | Boss |
| Difficulty | Average |
| Reward(s) | Death Knight's Longhaft Axe, Cerulean Amber Medallion +3, 130000 Runes |
The second Death Knight you're likely to encounter in the Land Of Shadow can be found at the end of the Scorpion River Catacombs in Rauh Base. Like the first, he's a pretty tough foe, this time with greater reach thanks to his massive Longhaft Axe. The biggest danger is his grab attack, telegraphed by a big Ghostflame explosion, because it will essentially kill you in one hit if it lands. Stay on the move, as you would while fighting a Crucible Knight.
Ancient Ruins Of Rauh boss locations

The Ancient Ruins Of Rauh tower far above the Rauh Base, and can be accessed only via the Viaduct Minor Tower bridging off from the Shadow Keep. In the Ancient Ruins Of Rauh you'll find 5 bosses, including an even harder Divine Beast Dancing Lion, and the (strangely easy) Remembrance boss, Romina.
74. Crucible Knight Devonia

| Location | Rauh Ancient Ruins, East |
| Boss Type | Noteworthy Foe |
| Difficulty | Average |
| Reward(s) | Devonia's Hammer, Crucible Hammer-Helm, 16289 Runes |
While technically unnamed, it's clear from the loot she drops that this is Crucible Knight Devonia. You can find her guarding the Cross in the Ancient Ruins Of Rauh, which you can access from the long bridge west out of the Shadow Keep. Devonia is generally just another Crucible Knight. Slow, powerful attacks, doesn't give you much time to heal. All the usual. She also turns into a centaur, or something. Regardless, she's annoying but not a real sticking point.
75. Hippopotamus #4

| Location | Rauh Ancient Ruins, East |
| Boss Type | Noteworthy Foe |
| Difficulty | Average |
| Reward(s) | Scadutree Fragment, 11960 Runes |
Found lounging in a lake near the Ancient Ruins Of Rauh Cross, another Hippopotamus lies waiting to give you its Scadutree Fragment. There's not much more to say about Hippos at this point - if you've fought the ones in the other regions, you know what to do here. Send it to Hippo Hell.
76. Furnace Golem #8

| Location | Rauh Ancient Ruins, West |
| Boss Type | Noteworthy Foe |
| Difficulty | Average |
| Reward(s) | Crimson-Sapping Cracked Tear, Furnace Visage, 14921 Runes |
The annoying thing about the Furnace Golem in the Ancient Ruins Of Rauh is that it sees you from a mile off and fires its huge fiery tunnel attack at you while you're crossing the bridge to reach it. Bait it into attacking you on one side of the bridge before diving over to the other, then get up close and punish it for its sneaky manoeuvres.
77. Divine Beast Dancing Lion

| Location | Grand Stairway Temple |
| Boss Type | Boss |
| Difficulty | Hard |
| Reward(s) | Divine Beast Tornado, 180000 Runes |
Once you make your way up to the highest area of the Ancient Ruins Of Rauh to the southwest, you'll find a temple guarded by - oh joy - another Divine Beast Dancing Lion. Only this one is much more dangerous than the one you faced in Belurat. Not only is it much tougher thanks to the Rauh region scaling, but this one substitutes the original's smoke attacks with Death Blight attacks which instantly kill you if your status meter fills up.
Make no mistake, this is a tough fight even when you're maxed out on Scadutree Blessings. Stay patient, because if you attack recklessly then you'll be punished by the Divine Beast's endless number of area-of-effect elemental attacks. With the exception of Bayle The Dread, this is the hardest non-Remembrance boss in the DLC in my opinion.
78. Romina, Saint Of The Bud

| Location | Church Of The Bud |
| Boss Type | Main Boss |
| Difficulty | Average |
| Reward(s) | Remembrance Of The Saint Of The Bud, 380000 Runes |
Romina, Saint Of The Bud is a gorgeously designed boss, but (a little sadly) she's probably the easiest of all the Remembrance bosses in Shadow Of The Erdtree in my opinion. The main boss of the Ancient Ruins Of Rauh, she can be found inside the Church Of The Bud, and her modus operandi involves long-range swipes and judicial application of Scarlet Rot.
Romina is, however, fairly squishy and susceptible to bleed, and her moveset appears a bit limited once you get up close and personal with her. Steer clear of her butterflies and you'll be fine.
Enir-Ilim boss locations

If you're in Enir-Ilim, you've reached the final legacy dungeon of the Elden Ring DLC. This dungeon is far from the largest From Software have made, but it is quite dense with tricky encounters, including three very powerful Divine Beast Warriors, and the notoriously challenging final boss battle - arguably the hardest boss in any From Software game.
79. Divine Beast Warrior of Lightning

| Location | Outside Spiral Rise |
| Boss Type | Noteworthy Foe |
| Difficulty | Average |
| Reward(s) | 10612 Runes |
On the path from the beginning to the end of Enir-Ilim, you'll encounter three Divine Beast Warriors, each of whom has a special elemental affinity. The first one you'll find is just up the stairs beyond the garden near the beginning of Enir-Ilim. It's a powerful foe with Lightning-imbued attacks that can fill the area with damage-dealing lightning bolts.
It is also one of the only enemies listed in this guide which can respawn, but it's worth highlighting regardless, as it's a very tough boss-like foe found shortly before the end of the DLC.
80. Divine Beast Warrior of Frost

| Location | Spiral Rise Rooftops |
| Boss Type | Noteworthy Foe |
| Difficulty | Average |
| Reward(s) | 10612 Runes |
My personal pick for the most challenging of the three Divine Beast Warriors, the Frost warrior can be found on the rooftops above the Spiral Rise, and it's an exceptionally nasty piece of work, with its relentless attacks dealing large area-of-effect Frostbite over and over until you prevail or die. This unhappy Horned Warrior also respawns, which incidentally would make it a great option for farming the Horned Warrior armor set - if it weren't also so challenging to defeat.
81. Divine Beast Warrior of Wind

| Location | Outside Cleansing Chamber Anteroom |
| Boss Type | Noteworthy Foe |
| Difficulty | Average |
| Reward(s) | Horned Warrior's Greatsword, 10612 Runes |
The final Divine Beast Warrior you encounter can be found on the staircase leading up to the Cleansing Chamber Anteroom, and it is the only one of the three Warriors that doesn't respawn after death. It also drops the Horned Warrior's Greatsword on its death as a nice little prize just before the end of the DLC.
This Warrior's elemental affinity is Wind, and it's very nearly as challenging in my book as the Frost-based Warrior you defeated just beforehand. The only saving grace is that you have quite a lot more room here to manoeuvre around the Warrior's attacks, so keep moving and strike at the right moments to bring it down safely.
82. Leda, Dryleaf Dane, and Allies

| Location | Cleansing Chamber Anteroom |
| Boss Type | Named NPC |
| Difficulty | Variable |
| Reward(s) | 300000 Runes, Variable Rewards |
What an absolute bastard of a fight this can be. The culmination of nearly every side quest in Shadow Of The Erdtree, this penultimate fight sees you face Needle Knight Leda and Dryleaf Dane, and potentially several other characters at the same time. Thankfully, depending on your actions in said quests, you may find that not only might some characters not appear to fight you, but they may actually be available as allies to fight with you against Leda.
83. Promised Consort Radahn

| Location | Gate of Divinity |
| Boss Type | Main Boss |
| Difficulty | Very Hard |
| Reward(s) | Remembrance Of A God And A Lord, 500000 Runes |
Here we are, at the final boss battle of Shadow Of The Erdtree - and in my opinion, the most difficult boss in all of Elden Ring. Promised Consort Radahn is an overwhelmingly mighty warrior even in his first phase, with a compendium of hard-hitting and hard-to-avoid combos from his dual Greatswords. And when the second phase begins and Radahn truly becomes the Consort Of Miquella, the screen becomes very busy indeed.
My advice? Max out your Scadutree Blessing and your Holy Damage Negation, and I might also suggest using Bloodhound Step to help you avoid some of the most dangerous attacks. Even then, this final boss is going to give you a very hard time. Congratulations if and when you manage to defeat him!
Just... whatever you do, don't allow yourself to be grabbed a second time without first using Miquella's Great Rune.
That concludes our (extremely) lengthy and comprehensive guide on all the DLC boss locations in Elden Ring: Shadow Of The Erdtree. If you're having trouble with any of these bosses, be sure to consult our list of the best weapons, best builds, best armor sets, best spells, best Ashes Of War, best Spirit Ashes, and best Talismans in Elden Ring. Yep, we really do have a guide for everything here.