Sekiro Corrupted Monk - how to defeat her apparition


You've made your way through Mibu Village in Sekiro; Shadows Die Twice, and it's clear that there is something very wrong with the townsfolk. They almost seem zombie-like and seem to be protecting something of incredible value. Like the monkeys before, one of their own is the last line of defence, which fades into view as you approach a cave. This Corrupted Monk's apparition has given people problems, but she only has one health bar and a fairly big hit box.
Those new and old to the library of From Software may wish to know more tips and tricks to get started, as well as some of the more complicated things that can occur while playing. Head to our Sekiro: Shadows Die Twice guide hub for everything you need to know.
There is now a dedicated Sekiro: Shadows Die Twice boss where you can find tips for the many bosses of the game. You can also look at our Sekiro: Shadows Die Twice Headless Ape guide for the previous boss battle.
Sekiro: Shadows Die Twice Corrupted Monk guide
This guide will go through each of the Corrupted Monk's attacks, how to counter them, and where her weak points are.
How to defeat the Corrupted Monk
There are a few small mercies grant to you here. Not only does the Corrupted Monk only has one health bar, she also is fairly big and rarely protects herself from your attacks. The downside is that she does have a few unblockable attacks that come at the beginning or end of combos. If she's mid-combo, she'll always do a swing attack, so leap into the air and kick her in the face by pressing the jump button.
We'll begin with the unblockables, since they're definitely the most dangerous. If you see the unblockable symbol, but it looks like she's not doing anything, that's because her spear thrust is surprisingly fast. Press the dodge button into the attack as soon as you see the unblockable symbol to execute a Miriki Counter. If the swiftness of this attack scares you, dodge to the side and clock her as you sidestep the thrust. When she winds the spear back at the beginning of an attack that's unblockable, she'll be trying to sweep you with the spear. Don't be tempted to rush in for damage after that swing unless you've kicked her in the face, as she'll slash again. Thankfully this second slash can be blocked.
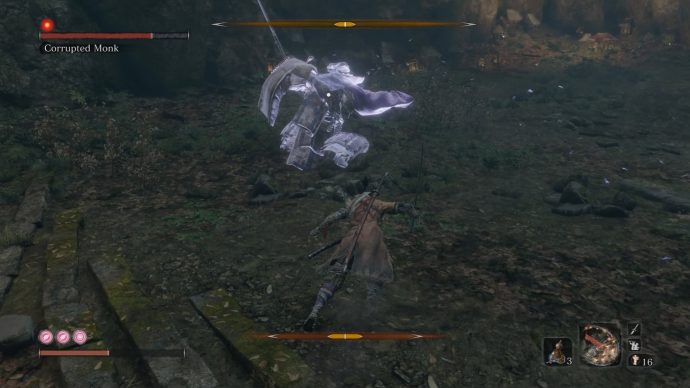
The Corrupted Monk's normal attacks are nothing to be sniffed at either. When she winds her spear over her right shoulder, she's about to swing repeatedly five times at a steady pace. You could try to deflect all five blows, but it's perhaps safest to back off so the first few whiff, before deflecting the last few. This will reduce how much posture is lost and the amount of time you'll need to guard to bring it back down. She also has two jumping attacks. If she rotates the blade as she jumps, the attack will be a slash that can be deflected. If she spins before she jumps, it's a slamming attack that can be sidestepped for an attack opportunity. Her last attack is one she tries at range. She'll telegraph it by holding her palm out towards you, then run for a swing of the spear. This is closely followed by a leaping slam, so rush underneath her to avoid making contact and get a few decent hits in.
As if it wasn't already obvious, the Corrupted Monk is an apparition. This means that she's particularly vulnerable to Snap Peas, as upon using them, she'll be stunned for a short time. Even though she's a mere illusion, she's also vulnerable to being hit by firecrackers. This could be good for getting out of tough binds too. Even though the arena is relatively big, getting caught next to a wall is nearly fatal. Not only will the camera go berserk, but due the size of the Corrupted Monk, she will take over the entire screen. This makes seeing what you're doing very difficult, so it's best to keep the fight to the centre of the arena.
With enough damage sustained by the boss, her deflection meter should raise and stay raised, which will allow you to end the fight with a posture break. Your rewards for beating her are the Corrupted Monk memory, and the Mibu Breathing Technique - which is mandatory for going after the treasure carp. More on that in our Sekiro: Shadows Die Twice masks guide.
When you try to come back to Lord Kuro, you'll see that Ashina Castle is under siege from a clan of Shinobi. Their leader is atop of the tower, close to your lord. Should you choose to side with Lord Kuro, you'll encounter the next boss battle. So join us for our Sekiro: Shadows Die Twice Great Shinobi Owl guide. You can also take a gander at our Sekiro: Shadows Die Twice boss where you can find tips for the many bosses of the game, or head back to our Sekiro: Shadows Die Twice Headless Ape guide for the previous boss battle.