We've put together 49 essential Canon DSLR photography tips and tricks specifically to help you get to the grips with your camera and all the great technology therein.
Many Canon owners never do much more than scratch the surface of their camera's capabilities. However, like an iceberg, seven-eighths of the DSLR's features remain unseen and unused!
Some of this is down to the user's inexperience or unfamiliarity with the camera, but a lot of it also boils down to how the camera's been designed.
Canon has squeezed in so many features, it's not always obvious how to access them (and the manual isn't always much clearer).
From basic stuff, like how to shoot in raw format, through to advanced shortcuts aimed at pros, you'll find everything you need to take better shots faster.
Here's what you need to know about using your Canon DSLR...
1. Select the raw image setting

Your EOS DSLR gives a wide range of image quality options, but to get the best results you should always go for uncompressed 'raw' files. Raw images reveal the best range of tones - and give greater flexibility when editing with software. It's almost always worth the extra space raw files take up on your card, while you can shoot JPEGs as well if you're not sure.
Get daily insight, inspiration and deals in your inbox
Sign up for breaking news, reviews, opinion, top tech deals, and more.
- Learn more: The A to Z of Photography: Raw
2. Go large
Although you should use raw most of the time, there are occasions when it can pay to compromise with the JPEG options in the Quality menu. Choose the 'Large' high-quality JPEG option when shooting a series of continuous shots and your camera will keep firing for longer.
3. Space-saving
The high-quality Large JPEG setting is also a handy option if you're running out of space on your memory card because you forgot to carry a spare card.
4. Firmware updates

Canon continues to improve the reliability and performance of its cameras, even after they have left the factory. That's why you should regularly check the latest 'firmware' available for your EOS DSLR. See which version you're using in your camera's menu. Then log on to Canon's website and search firmware updates to see if your camera models needs updating.
5. Make the most of Live View

Live View, where you see what the camera 'sees' on the rear LCD screen, is found on all recent Canon EOS models, but is switched off by default, but there's now a dedicated switch to activate this on the camera body.
The feature is useful for a wide range of subjects and lets you use the LCD to frame shots - it's particularly useful when using your Canon on a tripod.
6. Try sRaw

As well as being able to shoot JPEG and raw files, many modern EOS DSLR also allow you to shoot in sRaw, which offers many raw benefits while taking up less card space. But, sRaw means that the camera is using fewer pixels, so you won't get the same resolution or quality as raw proper.
7. Adjust your Dioptre

See things more clearly as you shoot by adjusting the viewfinder to your eyesight. The Dioptre, a mini thumbwheel at the top-right corner of the viewfinder, enables you to adjust the optics inside. Turn it while looking at the clarity of the numbers you see in the viewfinder, not at the image itself.
8. Shine a light
In low light, you can have difficulty seeing all your camera settings clearly. Use the full size of the rear LCD to help guide the way - the settings will be shown on the screen if you press the Disp or Info button as you set up the shot (the button you use depends on the model of EOS you own).
9. Top light

If you have an EOS with an LCD on the top (such as the Canon EOS 80D), this can be lit separately if you press the lightbulb button top left of the screen.
10. Adobe RGB

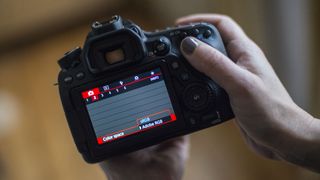
Buried in your menu is an option called Color Space. This comes preset to sRGB, but you will record a wider range of colours if you set it to the alternative Adobe RGB setting. This gives better printing results.
11. Format/erase
Before you go out shooting for the day, delete any pictures on the card you've already downloaded to your computer. It's easier to erase them all in one go, rather than one at a time. Use the Delete All command, or the Format menu option. Delete All simply removes all the pictures (except those locked using the Protect facility). Format has the advantage of deleting all data on the card - including all pictures - whether protected or not.
12. Keep quiet

Sick of the focusing confirmation sound? The Beep option in the Menu is on by default; turn it off to avoid scaring wildlife!
13. Back to default
If you get carried away with these tweaks and want to go back to your DSLR's 'factory fresh' settings, use the Clear All Camera Settings option in the menu. The camera will be set back to the way it left the factory. You can then start to customise it all over again!
14. Make sure you're saving your shots
Set the 'Shoot W/O Card' option to Off. The On option is good for demonstrating the EOS in the shop, but is a liability once you've bought the camera, because it allows you to take pictures without a memory card.
Phil Hall is an experienced writer and editor having worked on some of the largest photography magazines in the UK, and now edit the photography channel of TechRadar, the UK's biggest tech website and one of the largest in the world. He has also worked on numerous commercial projects, including working with manufacturers like Nikon and Fujifilm on bespoke printed and online camera guides, as well as writing technique blogs and copy for the John Lewis Technology guide.
Most Popular


